
![]()
*This document assumes at least a working knowledge of Macintoshes in general, including the ability to log into the campus Mac-servers. If you feel you need more instruction, go to the appropriate Rice-info documents. If these prove insufficient, the Usenet general mac-questions should answer most questions, otherwise contact the Rice Consulting Center.*
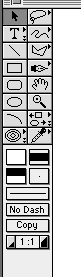
It is very simple to create diagrams of chemical systems using several programs available on the Central Mac server. Most drawing and painting programs on the macintosh have shared similar (if not identical) features and "tools" ever since the initial MacPaint and MacDraw programs almost eleven years ago. These have been added to over the years as various features (like color) have become available, but remain fairly constant from program to program. Below are some sample "tool bars" from various programs available through the Campus Mac server.

ClarisWorks 4.0™ |
Canvas 3.5™ |

Adobe Photoshop 3.0™ |
|
MS Word 6.0™ (how you select the tools option, top bar) |
|
The tool bar in MS Word 6.0™ (appears on the document bottom) |
A cursory glance should verify that most of the above contain options that are identical to one another. (Note: to save memory most of the above pictures were rendered into black and white, although they were mostly that way to start with.) Photoshop was included because it is useful for altering the the nature of graphics files, but is generally not necessary for printed work. Diagrams do not have to be incredibly complex or beautiful, check out the pichelps for ideas of what quality is expected. These diagrams should be little more complex than hand drawn ones, simply much neater and vastly more presentable.
Programs that can be used to paint and/or draw on the Mac-servers:
The only time you will be asked to provide computer graphics will be in reports, not in the average homework. As such, your pictures should be visually appealing, and usually serve to help clarify systems (rather similar to the pichelps, again.) Generally, it takes 5-10 minutes to assemble a picture which contains more information than words can carry.
To make a picture with precision, use a "drawing" document. This classification has become nearly obsolete, but it makes a difference when it still applies. "Drawing" documents are generally characterized by their more exact approach to graphics creation. New documents often come up with grids and position finding "rulers" to mark where the mouse is on the page. More importantly, "drawing" documents also have the ability to select each created "object" (be that object a box or a line) and then perform various actions with that object, such as translation and duplication. "Painting" programs may or may not have some or all of these features, but generally speaking, you need good "eye-mouse" coordination to successfully utilize these programs to get the same, crisp results you can get by "drawing."
Here is an example of drawing a separator in ClarisWorks 4.0™. To actually see the whole drawing procedure and the resultant graphics, go here (WARNING: long download times over a modem, only view if you are using an Ethernet connection or have nothing better to do with your time) All following pictures were taken from ClarisWorks 4.0™:
1. Creating the object body: Units are often easily represented by rectangles with either rounded or square corners. The following button selects "rounded corner" rectangle creation:
|
|
To create a rectangle, simply select that tool, and then, on the blank document pad, click and hold down the mouse as you drag the rectangle into the shape and size you desire. The color of rectangle can be selected by using options near the "paint bucket"
|
|
The three patterns underneath the "bucket" symbol can be used to select the pattern, color, and gradient of the rectangle.
2. Creating the streams: Once you have the unit, you need to create streams representing inlet and outlet. That is most easily done with the "line" tool:
|
|
This button will create lines that only point in increments of 45 degrees from "horizontal" on the screen. The following panel allows you to adjust line thickness, color, and pattern. It also lets you place arrows at whichever end of the line you choose:
|
|
If you select a line and "copy" it, it should make an exact duplicate of the original which you can then move into whatever position you want.
3. Adding text: Most programs will have a button labeled with a "T" or an "A." Simply click on that, and then click where you wish to place the text. Often, you can select the text field and move it as you would any other object, so don't worry about getting it exactly positioned the first time. Some programs (MS Word) will have you create a text field FIRST, and then you can start typing.
If you have a series of pictures to make involving one basic setup (all the pictures in the pichelps that involve one stream entering a separator and being separated into two), it pays to "Copy" that object (you can select it using the selection box or the lasso), and then "Paste" it into a new document, so all you have to do is include the text by each stream.
To take a "snapshot" of your screen, hit "shift-command-3." You should hear a "click" and the computer will freeze for a second or two. A file labeled "Picture 1" will appear on the hard-drive which your computer is running off of. Simple Text can open that picture, as can Adobe Photoshop. This option may or may not be available beyond system 7.5.3. Subsequent pictures are incremented as "Picture 2", "Picture 3", etc.
More complicated graphics, involving shading and perhaps even rendering, are easily possible on most Macintoshes. They are not covered here as they are rarely applicable to class situations. However, who knows what you might want to do? Personal recommendations:
Canvas™ has already been covered in part, but holds many more advanced features not covered in this 'page. Adobe Photoshop™ is capable of performing many complex and impressive operations to preexisting pictures. Finally, Mechanisto™ and Infini-D™ are both rendering programs capable of creating QuickTime™ movies and still .pict files. The difference between them is that Mechanisto™ is shareware, running $20 for an incredible piece of work. Specular's Infini-D™ is commercial-ware, running $600 for a more extensive and complete program.
Classes will not call for graphics of this caliber as of 2000, only use these advanced tools if you want to push the edge.
If you have any further questions/comments, contact the above listed sources, Dr. Davis or Dr. Zygourakis.
The following pichelps were made with a Mac:
[Ceng301
Homepage |Table
of Contents |Graphics
Help]