 Home
Home
A problem well stated is a problem half solved.
Charles F. Kettering
Day 2: Protein Extraction and Precipitation
Assignments Due
- Team library project
- List of complete references and summary of library research
findings (submitted as an "Assignment"
in OWL-Space by the specified due date/time)
- Elevator talk (2 minutes per team) *given
during lab
- Cell lysis techniques and making extracts (Scopes
2nd ed. pp. 26-37; 3rd ed. pp. 26-37)
- Review Colorimetric
Assay, Bradford protein assay, Using figures (graphs), Examples of graphs (from Experimental Biosciences Resources)
- Methods for measuring protein concentration (Scopes
2nd ed. pp. 278-283; 3rd ed. pp. 44-50)
- Precipitation techniques (Scopes 2nd ed. pp. 46-54;
3rd ed. pp. 76-85)
- Study Guide (bring a copy to lab)
- OWL-Space
BIOC 311 Resources (bring copies to lab)
- NH4sulfate_tables.pdf
- [Chromatography Resources]
- ProteinPurif_chrom.pdf
- SEC_BioRad.pdf
Preparation
- Methods and theories of protein extraction and precipitation
- Bradford assay
- Size exclusion chromatography column preparation
- Elevator talks
Overview of Experiment
Today we begin the partial purification of adenosine deaminase from native (mouse tongues) and recombinant (E. coli cells) sources.
The initial step in purification involves the extraction
of soluble proteins from the source: the cells are lysed or the tissue is homogenized, and cell debris
is removed by centrifugation. As a second purification step,
some proteins are precipitated using ammonium sulfate.
A size exclusion chromatography column is prepared for the
next purification step to be completed on Day 3; each team
needs to pour TWO columns.
Procedures
Note: Protein solutions should be kept on ice as much as possible.
E.coli lysis
Recombinant Source: Rodney E. Kellems,
Ph.D. (The University of Texas Health Science Center at Houston)
generously contributed an ADA deficient E.
coli strain, AR
120, which contains a plasmid, pots/ADA NE5,
with the coding sequence of the mouse adenosine deaminase gene.
Expression of ADA was induced by the addition of 0.2 mM isopropyl β-D-1-thiogalactopyranoside
(IPTG) to the culture during the log phase of growth.
1. Obtain TWO 0.25 ml pellets of E.coli in microcentrifuge
vials; get a rough determination of the amount of
starting material by weighing the vial containing the cell
paste and weighing an empty vial. Record all
masses in your notebook.
2. Add about 200 µl
volume of glass beads (106 microns and finer, Sigma-Aldrich,
St. Louis, MO) to each
tube. [Microcentrifuge tubes with about 200 µl
volume of glass beads are on the solid reagents bench.]
3. Add 1 ml of 10 mM EDTA, pH 6.5 to each tube.
4. Close the cap tightly and vortex the solution at high
speed for at least 5 minutes. Adjust the location or angle
of contact with the vortex cup if necessary to obtain mixing
of the paste with the beads; make sure there are no "clumps"
of bacterial pellet visible.
5. Let the solution cool on ice for an additional 10 minutes
(periodic vortexing may increase yield).
6. Clarify the lysate by
centrifuging for 15 minutes at 15,000xg, at room temperature
(in a microcentrifuge).
7. Proceed to the ammonium sulfate precipitation
step.
Tissue homogenization
Native Source: ICR and FVB strains,
adult mice (males and females) from the production colony (Center
for Comparative Medicine, Baylor
College of Medicine, Houston, TX); tongues stored at -80°C
until use.
1. Determine the mass of tongue tissue (4-5 tongues) sample. Record all
masses in your notebook.
2. Place
the frozen tongues in 3-4 ml of cold 50 mM Tris-Cl, pH 7.5,
1 mM EDTA in a 50 ml centrifuge vial.
3. Remove the homogenizing probe from the ice bath, place
it into your tissue solution, and homogenize at a setting of
4 or 5 for 30 seconds. Keep the sample chilled in an ice bath
throughout the procedure and move the vial to ensure that all
the mouse tissue is homogenized. After a 15-20 second pause,
repeat homogenization for a total of 1 minute of homogenizing
or until the solution is void of any visible tissue pieces.
4. Remove the tip from the sample and allow to drain for
a second or two along the edge of the tube. Set your sample
on ice.
5. Rinse the homogenizer by pulsing it several times in a
beaker of clean water. Re-position the tip in the ice bath.
6. Clarify the homogenate by centrifuging
for 15 minutes at 15,000xg. at
4°C (in the table top centrifuge).
7. Proceed to the ammonium sulfate precipitation
step.
Notes re centrifuge use and safety:
- Parameters on the instrument include temperature,
length of time, revolutions per minute (RPM) or relative
centrifugal force (RCF).
Temperature and time are self explanatory.
The setting of RPM's creates forces specific for a certain
rotor necessitating that published settings be reported in
RCF or xg (times g) so the description can be duplicated
on any instrument. Most instruments can be programmed by
RCF which eliminates manual conversions.
When changing the parameters on the Juoan tabletops, use
the "MODIFY" button,
NOT the "NEW Program."
- Safety and Care:
- Properly BALANCE all rotors. Use the Harvard Trip balance to prepare a tube of water that very closely matches the mass of your sample and tube.
Place the balanced set of tubes in opposing holes in the rotor.
- A rotor spinning at many thousand revolutions per minute contains a tremendous amount of kinetic energy that can be instantly dissipated into the chamber
in the event of a rotor failure. Most centrifuges have plate steel armor that contain the fragments but the centrifuge itself may leap violently and may cause bodily harm. It is always wise to maintain respect for this instrument and be certain to double check rotor and setting for each run to prevent these accidents.
- DO NOT PUT TAPE ON TUBES!
- DO NOT SLAM THE LIDS! This action breaks the latch mechanisms.
- Make sure the centrifuge gets up to speed before you walk away.
Ammonium sulfate precipitation
Ammonium sulfate may be added as a solid or as a saturated solution (4.01M). It is preferable to add the ammonium sulfate as a 100% saturated solution and our small sample size allows the use of this method for the first addition. However, in order to prevent significant dilution of the sample, addition of solid will be used in the second precipitation. It is important to add the salt slowly to the solutions to avoid creating localized areas of higher concentration than desired.
1. Determine the volume of the native crude extract (supernatant)
and transfer it to a clean 50 ml centrifuge tube;
determine the volumes of the recombinant crude extract (from
the two 1.5 ml tubes) and transfer them to a clean 50 ml centrifuge
tube.
Note: Set aside 200 µl of the crude
extract (supernatant
obtained after centrigugation of the lysate/homogenate) for
future determinations (Bradford assay, ADA activity, SDS-PAGE,
etc.).
Label your sample and store at
-20°C; use
more than your initials as labels. Proceed to the Bradford assay (see below).
2. Based on the volume recovered, calculate the amount of saturated ammonium
sulfate solution necessary to obtain a 40% saturation.
Note: See Appendix A in Scopes or calculate
using the formula. Remember to make all entries and calculations
directly into the notebook.
3. On ice, slowly stir this amount of saturated solution
into your sample to avoid local areas of high concentration
of the salt. Let the samples sit at 4°C for 20 minutes
and mix occasionally.
4. Centrifuge the sample at 10,000xg for 10 minutes at 4°C (table
top centrifuge) to pellet the precipitated material. (A
pellet may or may not be visible at this step.)
5. Carefully decant the supernatant into a clean tube. Determine
the volume of the supernatant and calculate the amount of solid ammonium
sulfate to add to increase the salt saturation from 40% to
80%.
6. Add the solid ammonium sulfate over 5 minutes while gently
mixing and incubate the solution for 20 minutes on ice with
occasional mixing.
Use a disposable transfer pipet to mix; gently pipet the solution and rinse the salt from the side of the tube.
7. Centrifuge the sample at 10,000xg for 20 minutes at 4°C (table
top centrifuge); the longer
centrifugation ensures the pellet packs "tight" to
the bottom of the tube.
8. Remove the supernatant and seal the tube with Parafilm;
store the pellet in a screw cap bottle at
-20°C until the next lab.
Protein determination using the Bradford assay
[Bradford, M.M. (1976) A rapid and sensitive method for the
quantitation of microgram quantities of protein utilizing the
principle of protein-dye binding. Analytical Biochemistry 72:
248-254.]
The Bradford assay is a dye-binding assay used to measure the protein concentration of a solution. This assay is not specific for any particular protein; so when you have a mixture of proteins, you can determine only the TOTAL protein concentration. Standards are needed because the dye does not bind proteins in a linear manner. The method is an equilibrium-binding process, and the curve approximates to a hyperbola. A standard curve must be generated each time you perform the assay.
When dissolved in strong acid, Coomassie Blue G-250, a hydrophobic, negatively charged dye, turns a red-brown color due to protonation. When the dye interacts with proteins, especially the basic (positively charged) pockets, the protons are bumped off and the absorption maximum of the dye shifts from 465 nm (red) to 595 nm (blue). The dye forms stong, noncovalent complexes with proteins by both hydrophobic and ionic interactions; these interactions stabilize the anionic form of the dye, causing a visible color change.
This assay is the SAME as the one you used to determine protein concentration in
Introduction to Experimental
Biosciences (Bios 211) .
PROCEDURE: Determine the protein concentration
in the CRUDE EXTRACT by using the
Bradford assay. This method will detect 10-50 µg of protein
per tube. Optimum wavelength for reading this colorimetric
reagent is 595 nm. Use the VIS lamp for these readings. The
reagent used in this assay stains the cuvettes. USE PLASTIC
CUVETTES ONLY.
- Genesys 5 spec: Select "1. ABS/%T/CONC" from
the main menu and use the "GO TO WL" key
to set the wavelength to 595 nm. Place cuvette containing
the BLANK solution (water + Bradford reagent) in slot
1;
close the lid and press "AUTO
ZERO"-- confirm that the BLANK reads zero by placing
the cuvette in slot 2 (DO NOT PRESS "MEASURE"). Replace
the BLANK solution with your protein solution, put the cuvette
in slot 2, close the lid, and read
the absorbance on the screen (DO NOT PRESS "MEASURE").
- Biowave spec: Press the "Other" key followed by the "Single/Multi λ" key.
Select "Single λ", then click on "Set λ" and set the wavelength to 595 nm. Place cuvette containing the BLANK solution (water + Bradford reagent) to the far-LEFT side of the chamber; press "REF." Replace the BLANK solution with your protein solution, put the cuvette to the far-LEFT, and press "TEST."
- Libra S22 spec: Press "1" on
keypad to enter Basic Modes. Press "1" on
keypad to select Absorbance; set the wavelength
to 595 nm and press F3 ("OK"). Place cuvette
containing the BLANK solution (water + Bradford reagent) in
the
BLUE cell
(cell 1), close the lid, and press green
run key. Replace the BLANK solution with your first
protein solution, put the cuvette in the
BLUE cell
(cell 1),
close the lid, and press green
run key; measure absorbances of remaining samples
in a likewise manner.
The following can be done as a team (four people) for both the native and the cloned samples.
- Prepare the set of protein standard solutions. Obtain a vial of 2 mg/ml bovine serum albumin (BSA) and prepare a set of standards by serial dilution.
- Label 5 microcentrifuge tubes: 1 mg/ml, 0.5 mg/ml, 0.25 mg/ml, 0.13 mg/ml, 0.07 mg/ml.
- Place 0.5 ml of water in all the tubes.
- Transfer 0.5 ml of 2 mg/ml standard into the 1 mg/ml tube and mix.
- Using a clean tip, transfer 0.5 ml of the 1 mg/ml solution into the second tube (0.5 mg/ml label).
- Continue the serial dilution sequence through the last tube.
- Place 0.05 ml of the standards in clean plastic test tubes.
- Prepare a plastic test tube for the BLANK containing 0.05 ml of water.
- Prepare at least two dilutions of the crude extract in microcentrifuge tubes. A 10 fold and a 100 fold dilution should give at least one reading on the scale.
Place 50 µl of the diluted crude samples in clean plastic test tubes.
**Do not dilute ALL of your 200 µl aliquot.**
- Add 2.5 ml of Protein Dye Reagent containing Coomassie Brilliant Blue G-250 to each tube. Mix well.
CAUTION: The dye reagent contains phosphoric acid and ethanol.
Take proper precautions to prevent contact with eyes and skin. Wear eye protection and gloves.
- Incubate samples for at least two minutes and then take absorbance readings at 595 nm. Zero the spectrophotometer with the blank solution in the cuvette
in the appropriate position. (Mark the cuvette to ensure that it is positioned in the instrument in the same orientation for every reading). Pour the blank back into the tube.
- Place the most dilute (most red-brown) sample into the cuvette
and place in the appropriate position. Record the
absorbance. Obtain readings for all the samples continuing
from light (red-brown) to dark (blue) samples. There is no
need to rinse the cuvette between readings if you go from "light" to "dark" samples.
- Construct a standard curve in your notebook. Plot absorbance
versus µg protein (or µg/ml). Determine the amount of protein
in your unknown samples. These determinations will be used
for specific activity calculations and for estimating the amount
of sample to be loaded onto the electrophoresis gels.
Assay stability samples
- Use the same assay methods as on Day
1 to determine the activity in buffer samples stored
at 4°C and -20°C.
- Compile your results to determine which buffers or conditions
are favorable for use during purification of murine adenosine
deaminase. Be prepared
to share your results with the class on Day 3.
Pour size exclusion chromatography column
NOTE: Columns must be poured first! Someone on your team
must be setting these up before you can get enzyme samples or
check out cuvettes.
Conventional columns are poured from bulk media. Advantages of this type of column are scalability and cost; you can construct any size column that you wish and the
materials are generally less expensive than prepoured columns or cartridges. Disadvantages include slow flow rates, limited resolution due to large bead size, and
variable performance.
As a general rule for size exclusion chromatography (SEC), the sample size should be 1-5% of the total bed volume and be of similar viscosity as the eluant
if you are trying to separate molecules based on size (BioRad catalogue, 1991). The columns provided are suitable for 1-2 ml samples sizes.
The flow rate used to equilibrate the column during equilibration should be similar to the rate used for the separation.
Acceptable flow rates can be calculated from information presented in Scopes (2nd ed., pp. 186-187, 192-198, 3rd ed., 238-239, 242-250) and in the BioRad handout.
During equilibration, the flow rate is controlled by adjusting the height of the outlet tubing.
We will pour size exclusion columns for use on day 3;
this column is the most difficult type to pour and run effectively.
Pouring a conventional column requires several items: column
with cap, stopcock, tubing, reservoir (funnel), ring stand,
and clamps.
- Determining bead volume
- Pour RO water into the column to 1-2 inches from the top of the glass.
- With a Sharpie, mark the column to indicate the target height
of the column (see Fig. 1).
- Measure the volume by pouring the water into a graduated cylinder.
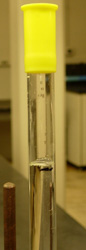
Fig. 1. Determining bead volume of SEC column.
- Setting up the column (see Fig. 2)
- Secure the column to a ring stand with TWO clamps; keep the
column vertical.
- Securely tape the tubing attached to the stopcock so that
the open end of the tubing is suspended about half way down
the column; the hydrostatic pressure head should ideally be 30-35 cm (pressures at 50 cm or greater will crush
the beads!).
- Attach a reservoir to the top of the column so the slurry
can be applied in a continuous pour (the funnel adds at least 100 ml to the volume of the column): smoothly wrap a couple
of layers of parafilm around the end of a funnel; secure the
funnel in the column with a firm quarter turn twist (do NOT
wrap parafilm around the outside of the funnel and column).
- Make sure the stopcock is closed.
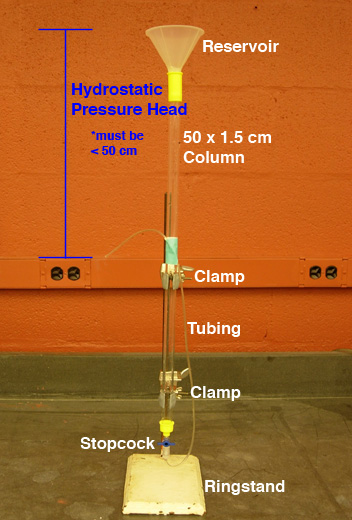
Fig. 2. SEC Column Set-Up.
- Pouring the column
NOTE: 50% slurry of Bio-Rad Bio-Gel P-60 polyacrylamide gel beads in SEC buffer (0.1 M KPO4,pH 7.4, 0.05 M NaCl, 0.02% Na azide) will be given to your team once the columns have been set
up (see Fig.
3)
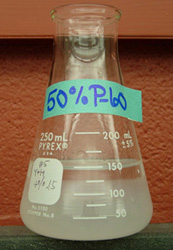
Fig. 3. 50% Slurry of P-60 Beads in SEC Buffer.
- Gently swirl the packing material thoroughly to achieve a homogeneous suspension before pouring your aliquot; transfer the slurry between two beakers
to make a uniform suspension.
NOTE: Never stir bead slurries with a magnetic stir bar or shake vigorously as this will grind the beads into smaller pieces and will clog the column.
- Obtain enough of the 50% slurry so that the settled
bead volume will match the volume you measured for
the column.
- Gently swirl bead solution and pour the entire slurry
into the column and reservoir at one time (should take no longer than 10-15 seconds).
Pour carefully to prevent bubbles
from getting trapped but quickly enough that the slurry does
not settle in the beaker.
- Let the beads settle to the bottom of the column. The settled layer will be slightly more opaque than the arriving beads.
After the settled layer is 1-2 cm in height (about 5 minutes), open the stopcock so buffer can flow through; position a beaker to collect the buffer.
- The column will take several hours to pack; the column
is ready when there are no longer two layers of beads
(i.e., the "opaque" line goes away). [See Fig.
4.]

Fig. 4. Appearance of packed SEC column
- When the column is packed, remove excess gel to the desired bed height if necessary.
- Close the stopcock and remove excess buffer from the funnel.
Leave several centimeters of buffer above the beads; if the liquid level goes below the packed material, this is known as running a column dry and necessitates
starting over.
- Remove the funnel and tubing (return these to the instructor)
and place the cap on the column.
- Label the column or ring stand and store at room temperature
at the end of the lab bench (small table next to the
wall).
Remember that other classes will be using this space, too.
Brainstorming: In practice, most column chromatography of enzymes is accomplished at 4 degrees C to help preserve enzymatic activity.
It is common practice to use room temperature buffers and to pour the column at room temperature then move the column and buffers into the cold.
However, it is not possible to store a column or its buffers in the cold then run at room temperature because small bubbles form throughout the packing.
Why?
Copyright, Acknowledgements,
and Intended Use
Created by B. Beason (bbeason@rice.edu), Rice University, 14 June 1999
Updated 23 August 2013