 Home
Home
The best way to escape from a problem is to solve it.
Brendan Francis
Day 2: Size Exclusion Chromatography
Assignments Due
- Calculations in lab notebook (due at the beginning of
lab)
- Standard curve for Bradford assay and calculation
of protein concentration for native and recombinant
crude extracts
- Volumetric flow rate (in ml/min)
for size exclusion chromatography NOTE: see step
5. under "setting up the column" below.
- Team
library project
- List of complete references and summary of
library research findings (submitted as an "Assignment"
in OWL-Space by the specified due date/time)
- Elevator talk (2 minutes per team) *given
during lab
- The
St. Martin's Tutorial on Avoiding Plagiarism (10
points)
- You must complete these ONLINE tutorials
and exercises by 11:30 pm on Fri., 17-May-2013
- Introduction and References (McMillan:
pp. 59-61, 78-81, 107-125, 126-160 (3rd ed.); 76-78, 104-107,
5-32, 149-153, 167-205 (4th ed.))
- Begin writing the Introduction section
of the paper and compiling the References.
Include relevant background information accumulated the first
day of class to develop a reason for the study based on possible
differences and a general outline of what approach your study
uses to determine wherther or not the recombinant enzyme
is the same as the native enzyme.
Bring a TYPED draft of the Introduction with References (cited
as in Protein Expression & Purification)
to Day 4 lab; please use
a paper clip; do not staple pages.
See Research Paper .
- Protein Purification Reference
- Choose an article from any scientific journal that presents
a purification of an enzyme AND contains a "purification
table" (*see description below)
- "Photocopy" just the Materials and Methods section on
purification and the purification section of the results
(a purification table MUST be present in the article)
- Prepare a cover page with your name and lab section;
record the complete reference for the article
- Bring this information with you to the 4th day of class
*A purification table is a table that summarizes each
step of the purification process and gives information such
as the procedure used, total protein, total activity, specific
activity, % yield, etc.
- Chromatography theory (Scopes 2nd ed. pp. 72-79;
3rd ed. pp. 102-111)
- Gel filtration (Scopes 2nd ed. pp. 186-198; 3rd
ed. pp. 238-250)
- Ion exchange chromatography, including pH and buffer
selection [Practical Aspects, Buffers for Use in Ion-exchange,
Conditions for Absorption, Procedures for Elution of Proteins
from Ion Exchangers] (Scopes 2nd ed. pp. 113-125; 3rd
ed. pp. 157-171)
- Study Guide (bring
a copy to lab)
- To familiarize yourself with operation of the Bio-Rad Econo
System, look at the instruction sheet beneath
each pump or visit Bio-Rad
- OWL-Space
BIOC 311 Resources (bring a copy to lab)
Preparation
- 1st discussion
- Size exclusion chromatography theory
- Detection of ADA activity
- Dialysis
- 2nd discussion
(given while columns are running)
- Elevator talks
- Writing the Introduction
Overview of Experiment
The salt pellet from Day 2 is run over the size exclusion
column. This column serves as a desalting step by removing
the ammonium sulfate and as a purification step by fractionating
the proteins based on size. Activity of the deaminase
is located using a QUALITATIVE spectrophotometric assay and
active fractions are pooled for dialysis. Buffers for the ion
exchange chromatography step are chosen, prepared, and used
for dialysis.
Procedures
Assay stability samples
- Use the same assay methods as on Day
1 to determine the activity in the incubated samples.
- Compile your results to determine which buffers or conditions
are favorable for use during purification of murine adenosine
deaminase.
- As a team, design and prepare a buffer for dialysis and anion exchange
chromatography. Give a brief rationale for your buffer choice in your lab notebook.
SEC Set-Up DEMO Videos (created by Xiao Zheng, Michael Yuan Yu Huang, and Xuan Yu, BIOC 311 Fall2011): Full-length (SEC Column Set-up) and 4 parts
Size Exclusion Chromatography
The column is part of a closed system when it is connected
to the chromatography system, and a peristaltic pump controls
the flow rate through the column (see Fig. 1). Two columns can be run from
each peristaltic pump. One column at each station can be eluted
through the UV monitor and an elution profile traced on the chart
recorder (not shown in Fig. 1).
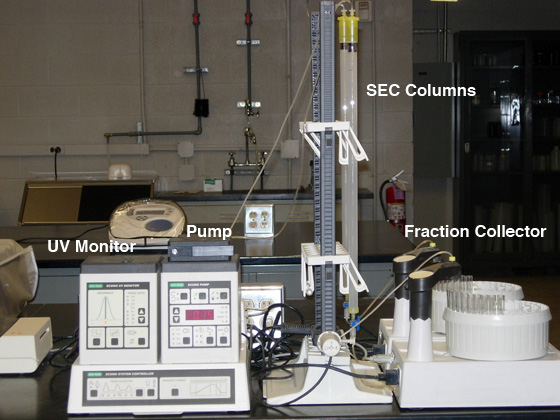
Fig. 1. Size exclusion chromotography station set-up.
- Preparing the sample
- Dissolve the ammonium sulfate pellet in a minimum of column buffer (normally the pellets can be dissolved to a final volume
of 0.5 to 1.5 ml).
SEC buffer:
0.1 M KPO4,pH 7.4
0.05 M NaCl
0.02% Na azide
- Transfer the sample to a 1.5 ml tube
and centrifuge (in the Eppendorfs) at maximum speed (16,000 x g) for 5
minutes to remove undissolved material (you may not see a pellet).
- Carefully transfer the supernatant to a clean 1.5 ml tube; store sample on ice until ready to apply to the top of the
column.
- Setting up the column
NOTE: Use
ONE pump station per team (two columns run simultaneously)
- Install the columns in the rack with the spring loaded
clips (see Fig. 2).
Handle and position the columns carefully so as not to disturb the beads.
*Remove any labels and return the clamps to the wooden cabinet and place the ring stand by the -80 freezer*
- Connect the outlet of the column to the fraction collector
directly (column on the right) or through the UV monitor
(column on the left).
- Open stopcock at the bottom of the column; put a small beaker
under the arm of the fraction collector to collect the waste.
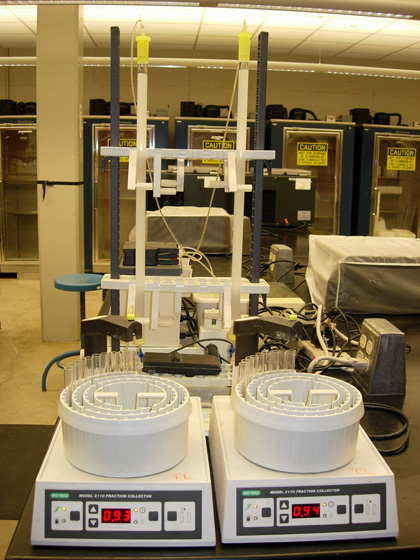
Fig. 2. Positioning of SEC columns. As facing the columns,
the one on the left connects to the UV monitor (the
"black box").
- Carefully remove the buffer down to the level of the gel
bed with a disposable transfer pipette (do
not use mechanical pipettors). DO NOT DISTURB THE BEADS!
NOTE: once the top of the beads appears "dry" close the stopcock until you load the sample.
***As soon as the samples are ready, LOAD them onto the columns
(see "Running
the column, steps 1-3" BELOW)--set the pump, fraction collector,
and UV monitor WHILE the samples are draining into the beds.
Remember, the rate-limiting step is getting the columns running!***
- Set the pump (see Fig. 3):
- Calculate the volumetric flow rate for
this column (diameter = 1.5 cm, length = 50 cm).
Linear flow
rates of 4-6 cm/hr are recommended for good resolution.
Linear flow rate equals the volumetric flow rate (e.g., ml/hr)
divided by the cross-sectional area of the column (with "r" in
cm). Follow the instructions for the pump
to set the flow rate.
- Convert the units to ml/min; set
this rate on the pump using the up/down arrows in the LED.
- Make sure the tubing inner diameter is set to 0.8 mm.
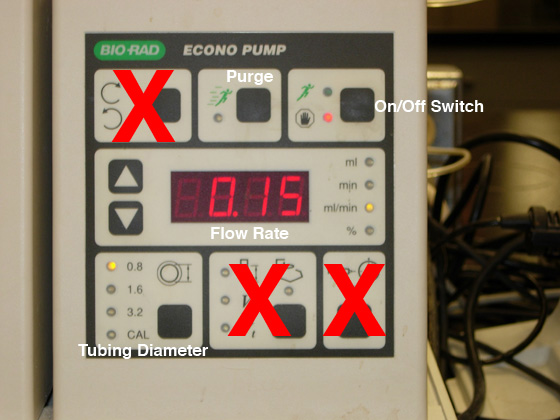
Fig. 3. Pump controls used for SEC. NOTE: do NOT press the toggle switches on the panels marked with a big, red X.
- Set the fraction collector (will be controlled "manually" today):
- The fraction collector will rotate tubes under the drip spout at the time interval (in min) that you program on the front of the instrument.
- Size exclusion columns typically will dilute the applied sample size by a factor of 5 to 10.
- Ideally, you want your sample divided into at least
5 tubes for good resolution. TARGET 5 slices to capture
the ADA peak (remember "area under the curve" from calculus)
*Each team will decide the volume of each fraction for the native
and cloned sources.
- Put 40-50 plastic tubes in each fraction collector.
- Set the UV monitor (see Fig. 4) [only one
column will be connected to the UV monitor today]:
- Adjust AUFS on right side of monitor: set the RANGE to
0.2.
- ZERO the monitor by pressing the left-most button; hold the button until it flashes.

Fig. 4. UV monitor control panel.
- Put lines to the pump in a beaker of SEC buffer (200-250
ml is enough for both columns) and attach tubing from pump
to caps.
Hold caps over beaker and press the purge ("fast" running
man) button to fill the lines with buffer; press button again
once lines are filled to turn off the purge mode; drape tubing
with caps over edge of beaker.
Do NOT use purge when the
lines are attached to the column.
- Running the column
- To load the sample:
- make sure the stopcock is OPEN
- with a disposable transfer pipette, slowly draw up the sample from the 1.5 ml tube
- layer the sample carefully onto the upper bed surface,
keeping the tip against the column walls and moving in
a circular motion (minimize generation of "bubbles" as
these can denature proteins) NOTE: never disturb
the top of the bed by dripping or squirting liquid into
it
- AFTER the sample drains completely
into the bed, add buffer (0.5 to
1 ml) to wash the sample into the bed (this step
is called the "chaser").
- AFTER the chaser has entered
the column, layer fresh buffer to
a height of 3-5 cm above the bed and attach the cap
(do not put cap on
tightly).
- START the PUMP ("slow" running
man) at the flow rate calculated above.
Once you've started the pump, DO NOT STOP
it until the team has collected ALL the fractions
with ADA activity for both native and cloned.
- Swing the arm of the fraction collector over the tubes
and start the fraction collector (push the "running man").
NOTE: when you start the fraction collectors, please ask us to start the chart recorder (paper speed = 6 cm/h) for you.
Suggestion: While the column is running,
familiarize yourself with the chromatography station. Read
through the manual for the controls for gradient formation,
fraction collector, column injection, etc. You will be
running a cartridge column using a gradient next lab period
that will employ nearly all the features of the station.
***Record the bead height of each column to the nearest cm. Wait until the columns have been running for a while since the bead height will decrease because of packing.***
- Test for adenosine deaminase activity in the fractions
using the qualitative spectrophotometric assay described
below. Combine all the fractions with measurable activity.
NOTE: Save a 200 µl aliquot, label, and
store at -20 degrees C.
***This spectrophotometric assay for ADA activity
is similar to the one used for the Stability Study. Since
only QUALITATIVE information is required for this lab,
the assays can be run "sloppily." Always use the ADA
assay buffer (50 mM KH2PO4, pH 7.4) for both
quantitative and qualtitative ADA assays.***
You MUST use a Genesys 5 Spectrophotometer for
the QUALITATIVE ADA assay.
- Use 1. Absorbance from the main menu and set the
wavelength to 265nm using the "GO TO WL" key; type in 265 nm
then press "ENTER."
- AUTO ZERO the spec with 3 ml of KPO4 assay buffer (place
the cuvette in slot 1).
[Why do you AUTO ZERO the spec BEFORE adding the adenosine?]
- Add 30 µl of 10 mM adenosine and invert to mix.
- Add 20 µl of the column fraction, invert to mix, and place the cuvette in slot 2. ADA activity is indicated by a steady decrease in absorbance. At least ten fractions with NO activity can be screened in a single cuvette. Begin at one end of the rack and proceed until activity is found. Make a new solution in a cuvette and start assaying fractions from the other end of the rack to bracket the activity. One or two fractions within this bracket should be tested to ascertain that it is a true and continuous peak of deaminase activity.
- Take a reading of the combined fraction at 280 nm on the spectrophotometer. Use the size exclusion column buffer to ZERO the instrument. This is a case when it is advisable to use the same cuvette for zero and the measurement because small variations between the cuvettes add error to the measurement.
- Genesys 5 spec: Select "1. ABS/%T/CONC" from
the main menu and use the "GO TO WL" key
to set the wavelength to 280 nm. Place the column buffer
in slot 1; close the lid and press "AUTO
ZERO" -- confirm that the solution reads zero
by placing the cuvette in slot 2 (DO NOT PRESS "MEASURE").
Replace the buffer solution with your protein solution,
put the cuvette in slot 2, and read the absorbance
on the screen (DO NOT PRESS "MEASURE").
- Biowave spec: Press the "Other" key followed by the "Single/Multi λ" key.
Select "Single λ", then click on "Set λ" and set the wavelength to 280 nm. Place cuvette containing column buffer to the far-LEFT side of the chamber; press "REF." Replace the buffer solution with your protein solution, put the cuvette to the far-LEFT, and press "TEST."
- Libra S22 spec: Press "1" on
keypad to enter Basic Modes. Press "1" on
keypad to select Absorbance; set the wavelength
to 280 nm and press F3 ("OK"). Place cuvette
containing column buffer in the
BLUE cell
(cell 1), close the lid, and press green
run key. Replace the buffer solution with your protein
solution, put the cuvette in the
BLUE cell
(cell 1),
close the lid, and press green
run key.
SAVE YOUR PROTEIN SOLUTION!!
Optimally, one determines protein concentrations and activities
associated with the individual fractions to aid in the
decision of what fractions are to be pooled and which are
to be discarded. The absorbance trace from the elution
profile can be used to estimate the relative amount of
protein in each sample. A280 readings are quick, nondestructive,
and provide a good estimate of protein concentration in
fractions.
Dialysis
The pooled sample from the size exclusion column (P-60
fraction) is dialyzed
to change the buffer composition of the sample and decrease
the volume for convenient application to the Q cartridge. Dialysis
can take care of these two problems over the weekend without
your attention. (Normally this is accomplished in several hours
or overnight.)
- For dialyzing and concentrating your sample, prepare a
solution of 10% (w/v) polyethylene glycol compound (recommended
range = 15,000-20,000 MW) in 500 ml (TOTAL volume) of anion
exchange buffer in a beaker. (The PEG does not have
to be completely dissolved.) Because we are dialyzing over
a weekend, the 10% solution is sufficient; for overnight
concentrating, 20% PEG is recommended. The concentrating
effect of this solution is sufficient to remove essentially
all the free water and will leave only a precipitate of proteins
in the collapsed tubing. Unlike some enzymes, the deaminase
survives this treatment.
- Obtain a length of dialysis tubing, with a recommended
range of 6,000-8,000 molecular weight cut off (MWCO),
that will hold your sample plus 5 -10 cm excess.
NOTE: Limit handling of the tubing with bare hands to prevent the contamination with enzymes and bacteria from your skin.
The tubing box gives the molecular weight cut off
limits and the volume of solution per cm of tubing (ml/cm).
- Soak the tubing in RO water for at least 3 minutes.
- Smooth out one end and place a clip over a single thickness of tubing.
The clips are designed to close over only one layer of tubing; clamping more than this
weakens the hinge and it may break during dialysis.
- With one clip in place fill the tubing with buffer or water to check for leaks over the surface of the tubing
and the clip.
- After you have determined that the tubing is leak-free, discard the water and use a disposable transfer pipet to fill the tubing with your sample.
Loading tip: hold the tubing over a clean weigh boat; if you spill your sample, you should be able to recover most of it.
- Apply the second clip, leaving some dead space in the tubing, and place the tubing into the dialysis solution set to gentle stirring over a magnetic stirrer in
a cold box (4°C). Be certain that the stirrer will not pull the tubing into the bar as this may wear a hole in the sack.
(A team may place both their samples in the same solution
for dialysis.)
Copyright, Acknowledgements,
and Intended Use
Created by B. Beason (bbeason@rice.edu),
Rice University, 25 May 2010
Updated 3 January 2014