 Home
Home
Happiness lies in the joy of achievement
and the thrill of creative effort.
Franklin D. Roosevelt
Day 7: Isoelectric Focusing and Western Analysis
Assignments Due
- Draft of Introduction with References is due at the beginning of lab.
*Please do not staple pages;
use a paper clip.
- Discussion (McMillan: pp.
71-75, 83-85, 126-160 (3rd ed.); 89-94, 110-111, 167-205 (4th
ed.)); include appropriate References (cited
as in Protein Expression & Purification).
See Research Paper .
- Abstract, Title, and the Final
Draft (McMillan: pp. 52-59, 77-78, 126-160, (3rd ed.); 69-76,
167-205 (4th ed.))
- Isoelectric focusing (Scopes 2nd ed. pp. 290; 3rd ed. pp. 299)
- Measurement of enzyme activity (Scopes 2nd ed. pp. 253-260; 3rd ed. pp. 50-55)
- OWL-Space
BIOC 311 Resources (bring copies to lab)
- [Electrophoresis Resources]
- POST-LAB DUE DATES
- Final notebook pages (including ALL
graphs and data analyses/conclusions, corrections and
Table of Contents) are due
by 3 pm on Wed., 12 March (your BIOC
311 folder in Biology basement)
- please include your notebook grade sheet and graded
notebook pages
- Results draft (including
text plus figures and tables planned for the final
paper)
is due by 3 pm on Wed., 19 March (ABL
326: Dr. Beason's inbox) *Please do not staple pages; use
a paper clip.
- Discussion draft (with appropriate
references) is due
by 3 pm on Wed., 26 March (ABL 326:
Dr. Beason's inbox) *Please do not staple pages; use
a paper clip.
- Final paper is due
by 3 pm on Wed., 9 April (ABL 326:
Dr. Beason's inbox or BIOC 311 box)
- Along with your final paper, you must turn
in
ALL of your graded
rough drafts
- Please place all of your work in a folder with
pockets and
put your name and lab section on the OUTSIDE of the
folder. Do
not use staples or paper clips on your work.
Preparation
- Writing the Discussion and Abstract
- Isoelectric focusing
- Coupled enzyme assays
- Western blot development
Overview of Experiment
Isoelectric focusing (IEF) is used to determine the isoelectric
point of ADA: the band corresponding to adenosine deaminase
is located by a colorimetric activity stain specific for the
enzyme. The western blot is developed by using antibodies
that have been raised in goats against the native mouse adenosine
deaminase: these antibodies bind to protein bands that correspond
to adenosine deaminase and are located by using a conjugate
antibody system consisting of anti-goat IgG antibodies covalently
linked to alkaline phosphatase; the phosphatase reacts with
BCIP producing a purple product. Molecular mass (m) of
both native and recombinant ADA is estimated from a standard
curve.
Procedures:
Isoelectric Focusing
- Instructions for the IEF gel are adapted from Bio-Rad Manual 9108, Model 111 Mini-IEF Cell (Bio-Rad Laboratories). Follow the instructions below to construct and run an IEF gel.
- The IEF gel is only 5% acrylamide and very thin making it
impossible to manipulate without support. For this reason,
the gel is poured in contact with gel support film (Bio-Rad),
a plastic membrane that covalently crosslinks to the
acrylamide. Do
not try to remove the gel from the plastic.
- Notice: The gel recipe is for TWO gels; two teams will
prepare the gel mix together, and each team will cast
ONE gel.
- Load 4 µl of the fraction with
the highest TOTAL activity;
load both the recombinant and the native samples
on each half of the gel.
- Prestained IEF
standards will be provided; load 2 µl of standards on
each side of the gel. At the end of the run, the gel
will be cut into two.
Attaching the gel support film to the glass plate
- Place the clean glass plate on a paper towel. The towel serves to soak up the water squeezed from beneath the membrane and provides a slightly padded surface.
- Place a narrow line of water across the middle of the plate.

- The gel support film (Bio-Rad) has two surfaces, a treated hydrophilic side
which the acrylamide adheres to, and a hydrophobic side.
The film will be given to you with the hydrophilic side up; if you forget which side is which, put a drop of water on the edge of the film: it beads on the hydrophobic side and spreads on the hydrophilic side.
Bend the support film U-shaped and place hydrophobic
side DOWN against the glass plate. Relax the bend and
align the membrane with the edges of the plate. The membrane
must not extend past the edges of the glass.
- Roll with a clean test tube with significant downward pressure to squeeze out as much water as possible. Avoid wetting the hydrophilic side of the membrane.
- Carefully blot off any excess liquid at the edges.
Preparation of the polyacrylamide gel
***WARNING: unpolymerized acrylamide is a potent neurotoxin! always wear gloves and dispose of solution carefully.***
- Prepare the monomer-ampholyte solution in a 125 ml sidearm flask.
*Flasks, 1 per two groups, with rubber stoppers are available
on the reagent bench.
- Degas the solution for 5 minutes using the vacuum in the
hood; do not degas longer since some O2 is required to catalyze
riboflavin-5'-phosphate (FMN).
*Disconnect the flask from the vacuum source BEFORE turning
off the vacuum.
- Add the catalyst solutions and swirl gently.
- Pipet the gel solution between the glass plate and the casting
tray: see Casting the gel below.
- Fill the disposable transfer pipet with any remaining acrylamide solution and discard in the trash; rinse the flask with RO water and return the flask and stopper to the reagent bench.
The following volumes are for casting TWO 125x65x0.4 mm gels
(cast ONE gel per team):
Monomer-ampholyte solution
|
|
RO-H2O
|
5.5 ml
|
|
acrylamide monomer concentrate
(25% T, 3% C)
|
2.0 ml
|
|
25% (w/v) glycerol
|
2.0 ml
|
|
amphloyte (pH 3/10 or pH 4/6, Bio-Rad)
|
0.50 ml
|
Catalyst solutions
|
|
10% (w/v) ammonium persulfate
|
15 µl
|
|
0.1% (w/v) riboflavin 5'-monophosphate (FMN)
|
50 µl
|
|
TEMED (neat)
|
3 µl
|
Casting the gel
- Put the glass plate SUPPORT FILM SIDE DOWN in
the casting tray.
- Fill a disposable plastic transfer pipet with the acrylamide solution.
- Generate and maintain a puddle of liquid on the casting tray just off the corner of the glass plate. It is not necessary to sweep or move the pipet tip during dispensing. The liquid will be drawn between the membrane and casting tray by capillary action.
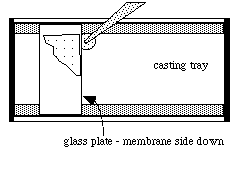 If the casting tray is very clean there should be no problems with air bubbles forming. Release solution slowly to prevent bubbles; if a bubble forms, carefully move the plate sideways until the bubble is at the edge.
- Set the tray in sunlight for 45-60 minutes.
- To remove the gel, lift one corner with a flat spatula inserted between the gel and the casting tray. Air will appear under the gel and then you can gently lift the glass plate from the casting tray. Do not apply too much pressure or you'll chip the corner of the glass plate.
- Flip the plate over so gel side is facing up.
***NOTE: It is important not to let the gel set out for more than 20 minutes before starting the run. The gel can dry resulting in insufficient water to carry the current for proper electrophoresis. Plan your work in advance - be prepared to load the samples and get them running without delay.***
Loading samples
- A sample template will not be used. Just apply your samples
directly onto the surface of the gel
(2 µl
of standards, 4 µl of samples) leaving sufficient space
between each to prevent the drops from merging. Wait 2-3 min
for the samples to soak in.

- Remove the graphite electrodes from the electrophoresis cell and rinse them with RO-H2O; place the electrodes back into the cell and lightly moisten them with RO-H2O.
- Place the gel, SAMPLES SIDE DOWN, directly on top of the electrodes.
Do not remove the glass plate from the gel support; the weight of the plate helps maintain good contact between the gel and the electrodes.
- Carefully slide the lid onto the IEF cell and plug the cables into the power supply.
Running the gel
*Isoelectric focusing is carried out under constant voltage conditions in a stepped fashion:
- S1 = 100 V for 15 minutes
- S2 = 200 V for 15 minutes
- S3 = 450 V for 60 minutes
**Up to three different sets of running conditions can be programmed and run in sequence with the Bio-Rad Model 1000/500 Constant Voltage Power Supply; the power supply automatically switches to the next step and turns itself off at the end of the last step.
- Turn on the power supply; switch is located on the right side.
- Press PROGRAM until S1 is lit.
- Set the voltage and the time (in hours).
- Press PROGRAM once so S2 is lit.
- Set the voltage and the time (in hours).
- Press PROGRAM once so S3 is lit.
- Set the voltage and the time (in hours).
- Press PROGRAM until S1 is lit.
- Press the RIGHT SELECT button until DISPLAY is lit to monitor the actual voltage (v) and current (ma) during the run. As the focusing nears completion, the current decreases to near zero.
- Press RUN.
***IMMEDIATELY after the run is completed, cut the gel
in 1/2 using scissors and proceed with activity stain.***
Keep gel-side UP; if you put gel-side DOWN, the gel
will stick to any surface and will be ruined.
BIO-RAD IEF Standards
Protein
|
Color
|
pI
|
MW
|
|
Phycocyanin (3 bands)
|
Blue
|
4.45
4.65
4.75
|
232,000
|
|
Beta-lactoglobulin B
|
-----
|
5.1
|
18,400
|
|
Bovine carbonic anhydrase
|
-----
|
6.0
|
31,000
|
|
Human carbonic anhydrase
|
-----
|
6.5
|
28,000
|
|
Equine myoglobin (2 bands)
|
Brown
|
6.8
7.0
|
17,500
|
|
Human hemoglobin A
|
Red
|
7.1
|
64,500
|
|
Human hemoglobin C
|
Red
|
7.5
|
64,500
|
|
Lentil lectin (3 bands)
|
-----
|
7.80
8.00
8.20
|
49,000
|
|
Cytochrome C
|
Red
|
9.6
|
12,200
|
NOTE: These standards must be recorded in your lab notebook.
Activity Stain of IEF Gel
This colorimetric activity assay uses
an enzyme-coupled system and is specific for ADA.
Stock Solutions
100 mM Tris-HCl, pH 8.0, 10 mM Na arsenate, containing 10
mM adenosine
xanthine oxidase (0.01 U/µl) and purine nucleoside phosphorylase
(0.08 U/µl) = (XO:PNP) [*enzymes purchased from Sigma-Aldrich]
10 mg/ml nitroblue tetrazolium chloride (NBT)
1 mg/ml phenazine methosulfate (PMS)
1% agarose solution (melted then held at 50°C in a water
bath)
Procedure
Read over this section carefully and be prepared to complete
the protocol quickly; solution volumes are for a 1/2 gel.
- With 10-15 minutes remaining on the IEF run, incubate
2.75 ml of Tris/arsenate/adenosine solution at 37°C
in a 100 ml beaker.
- As soon as the gel electrophoresis is finished, complete the detection solution by adding the following to the incubated Tris-substrate solution:
10 µl XO:PNP
Mix
300 µl NBT solution
and 300 µl PMS solution
NOTE: do NOT add NBT and PMS until you are ready
to pour the agarose overlay (i.e., add the agarose and proceed
with step 3.); these compounds are light sensitive and will turn "purple" if
exposed to light for too long
Mix well
NOTE: Be frugal with the solution because the
enzymes used in this assay are moderately expensive.
Slowly add 2.7 ml of melted 1% agarose solution from the 50°C bath; use a disposable transfer pipet with the bulb
squeezed completely in to deliver ~ 2.7 ml.
Let the agarose flow down the side of the 100 ml beaker to
aid in cooling to prevent denaturation of the enzymes. Swirl
gently to mix but avoid introducing air bubbles into the solution.
Be prepared to complete step three immediately; the
solution may solidify within 5-10 seconds.
- Immediately, pour the molten
detection mixture evenly over the gel that you wish to stain
for activity. Just pour from the beaker and "puddle" the
reaction solution over the surface of the gel. Place the
gel on a plastic lid while applying the gel solution
and allow the slurry to harden before moving the gel. Keep
the slurry on the gel. Any material off the gel is wasted.
Air bubbles may be coaxed to the edge or popped using the
bulb of a transfer pipette.
- Incubate the gel in the dark (PMS and NBT are extremely
light sensitive; protect these solutions from light as much
as possible) at 37°C.
-
Check the development after 20
minutes: if specific bands are present,
photograph the gel for your records (each team should bring
a DIGITAL CAMERA to lab--SmartPhones
don't always work (get background lines in image)--can try
using HDR setting or use video "slow motion" mode
and take a screenshot)); if no distinct bands
are visible, let the reaction proceed for an additional 10-15
minutes--after this time, if only nonspecific staining is
present, discard the gel (no picture is necessary).
- Estimate the pI from the relative position
of the ADA band compared to the standards.
Develop the immunoblot (Western)
Solutions
Tris buffered saline (TBS): 10 mM Tris-HCl, pH 8.0, 150 mm
NaCl
TBS + 0.05% Tween 20 (TBST)
Blocking solution: 1% (w/v) Carnation instant milk solution in
TBST
Staining solution: premixed alkaline phosphatase conjugate
substrate solution (Bio-Rad) contains nitroblue
tetrazolium (NBT) and 5-bromo-4-chloro-3'-indolyphosphate
p-toluidine salt (BCIP) in buffer; protect solution from light.
Procedure
Small volumes (~ 10 ml) are used for preparation of the membrane.
Place the membrane in the small plastic box to ensure complete
coverage of the membrane surface.
- Wet the PVDF membrane in methanol for 1-2 seconds. Rinse briefly with water and immediately place in the blocking solution. If the membrane "dries" and becomes opaque white or blotchy, wet with methanol again. The white area will not wet in aqueous solutions during the incubations.
- Block excess protein binding sites by placing the membrane
into 10 ml blocking solution for at least 1 hour on the rocking
shaker.
- Pour off the blocking solution and rinse blot with TBST (to
remove residual milk).
- Bind the primary antibody (goat anti-mouse
ADA antibody, from Bethyl Laboratories, Inc., Montgomery,
TX) diluted 1:10,000 in TBST: a 10 ml aliquot of diluted
antibody will be provided; incubate for 30 minutes on the
rocking shaker.
- Wash for 3-5 minutes in TBST. Repeat two times.
- Bind the secondary antibody (anti-goat IgG-alkaline
phosphatase antibody produced in rabbit, from Sigma-Aldrich)
diluted 1:10,000 in TBST: a 10 ml aliquot of diluted antibody
will be provided; incubate for 30 minutes on the rocking shaker.
- Wash the membrane as in step 5.
(Optional step (we do
not use): To decrease nonspecific interaction of the antibodies
to some proteins, salt (NaCl) may be added to the wash buffer
as high as 0.6 M concentration.)
- Blot membrane on paper towel to remove excess liquid.
- Transfer membrane to staining solution and incubate for about
5 minutes. Monitor the development -- this is not an end point
detection system.
- As soon as you see purple bands first appear, rinse with
RO water for a few minutes to stop the reaction.
- Let blot dry
at room temperature; take blot with you (either scan or make
enlarged copy of membrane for analysis).
Analysis
Proteins are denatured by boiling in the presence of excess
SDS and beta-mercaptoethanol; since SDS-treated
proteins have essentially identical charge:mass ratios, these
denatured proteins separate strictly according to size through
polyacrylamide gels. Under these conditions, a plot of
log(10) molecular mass vs. relative mobility (Rf) shows a linear
relationship (1, 2).
NOTE: for any given gel concentration, the relationship between log(10) molecular mass and mobility is linear over only a limited range (for a 10% gel the range is 15,000-70,000 Da).
Since the molecular mass standards are electrophoresed on the
SAME gel as the unknown proteins, a STANDARD CURVE can
be constructed by plotting log(10) molecular mass of
the standard (Daltons) vs. distance migrated by
the standard (measured from the TOP of the gel). (You
do NOT need to determine Rf's unless your
dye front is distorted.)
NOTE: this graph must be hand-drawn in your laboratory notebook. although calculators/computers can generate the curve for you, by plotting the curve manually you can ensure that your unknown lies on the linear (and therefore valid) portion.
***You have to construct a standard curve to determine
the molecular mass of recombinant and native ADA.***
NOTE: Molecular mass (symbol "m") is expressed in
daltons (Da); one dalton is 1/12 of the mass of carbon 12. Apparent
molecular weight (Mr, relative molecular mass) is the ratio of
the mass of a molecule to 1/12 of the mass of carbon 12 and is
dimensionless; hence, it is not correct to express Mr in daltons. Report
your results for recombinant and native ADA as molecular mass
(m), in daltons or kilodaltons.
References:
- Shapiro, A.L., Vinuela, E., and Maizel,
J.V. (1967). Molecular estimation of polypeptide chains by electrophoresis
in SDS-polyacrylamide gels. Biochem. Biophys. Res. Commun.,28:
815-820.
- Weber, K. and Osborn, M. (1969). The reliability of molecular weight determinations by dodecyl sulfate-polyacrylamide gel electrophoresis. J. Biol. Chem.,244: 4406-4412.
Copyright, Acknowledgements,
and Intended Use
Created by B. Beason (bbeason@rice.edu), Rice University, 16 June 1999
Updated 22 February 2014