|
|
|
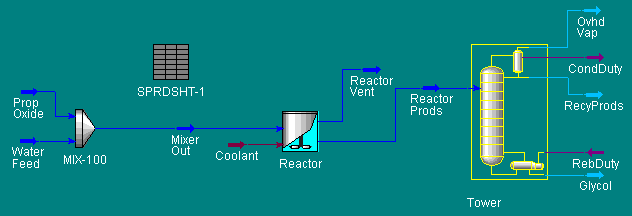
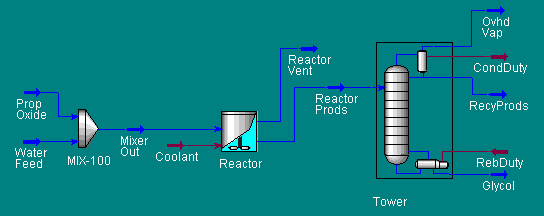
This example will build on the simulation you made for the Chemicals Tutorial Case from Chapter 4 of the Tutorials Manual. You did complete that example, didn't you? Hint, hint, wink, wink, nudge, nudge. Well just in case you didn't, the example consisted of using a CSTR to react Propylene Oxide with Water to make Propylene Glycol, then separating that out as a product. Now we would like to explore that reaction a little more, from a plant design stand point. Utility costs, and other issues, are directly tied to the temperatures we use for various operations. In this case, the temperature we set for our reactor determines how much coolant is required and has a direct effect on how well the column runs, and of course, it has a critical effect on the reaction itself. Another big issue is Capital Costs. Since the general rule goes, the bigger the piece of equipment, the more expensive it is, we'd like to see how sensitive the reaction is to the size of the reactor. Now we could plug about 200 different combinations of temperature and size in by hand, but what would be the point when HYSYS has so thoughtfully provided us with a tool to do just that. It's called a Case Study (very similar to Sensitivity Runs in Aspen) and is available as part of the DataBook. Start by opening up the file you made from the Tutorial. If you do not have such a file you may start from my version entitled ChemicalsEx.hsc in my sample directory or use TUTORIAL3.hsc from HYSYS' sample directory located on the server HARTSOOK. When you begin, your PFD should look approximately like this
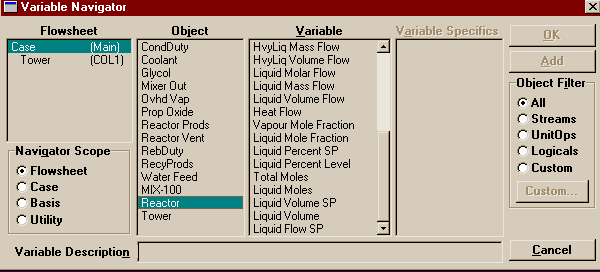
The first thing we should do is refresh ourselves on the current conditions, so open the Reactor's Property View. On the Worksheet Page, you can see that currently the entire contents of the reactor are exiting via Reactor Prods (Reactor Vent has zero flow) at 140 o F. Note that I am using the same Units Set that was used in the Tutorial (essentialy Field, with Liquid Volume Flow set to USGPM, but any Field based set should be fine for this example). On the Reactions Page, you can see that the current Liquid Volume is 238 ft3 and that the current conversion in the reactor is 94.70 % (remember, in this simulation the reaction occurs in the liquid phase). Since we will be varying the liquid volume by changing the Liquid Level percentage and we like even numbers, go ahead and change the Vessel Volume to 300 ft3. Note that the Liquid Volume didn't change because HYSYS adjusted the liquid level to keep it constant. In general it is a good idea to be aware of your settings before running a case study as the Case Study will not return you to your original state afterwards. Perhaps, you might want to develop the habit of always making a record in the Data Recorder (also part of the DataBook) right before running your Case Studies. Go ahead and open up the DataBook now (under the Tools menu). On the Variables Page, you should see three variables already defined. One of these, Reactor Temp, we will actually use ourselves. We will need two more variables: the liquid level and the reaction conversion (conversion is a much better measure of the efficiency of a reactor than just looking at the flow or concentration of product in the product stream). Press Insert ... . The Variables Navigator will appear. Select Reactor from the Object List.
Perhaps, you've noticed our first problem. Yep, Conversion is nowhere to be found on that list of Variables. All right, we'll worry about that in a second. Let's go ahead and get the Liquid Percent while we are here. What's this! There are two variables called Liquid Percent: Liquid Percent SP and Liquid Percent Level. Well, the SP probably means "Set Point" which sounds like a Dynamics thing, not a Steady-State variable, plus the title of the variable we want to affect on the Reactions Page of the CSTR's Property View, called it "Liquid Level", so let's choose Liquid Percent Level (I'll show you later why this is the wrong choice). Blissfully, unaware that we just made a mistake, let us now proceed to doing something about the Conversion. See HYSYS just gave us that conversion as a little helpful bonus. It doesn't actually consider it a variable and heaven forbid you should actually want to use it for something. Therefore we must make our own Conversion calculation. And where do we get to make our own calculations? That's right girls and boys, the Spreadsheet (and your profs complain you don't pay attention -- Well, actually they complain that you don't come to class, but that is neither here nor there). Begin by adding a Spreadsheet to the simulation (  on the Object Palette). We are going to do things a little
differently from the way we did things in the SET
example with the Spreadsheet. Instead of importing
variables on the Connections Page, we are going to do
it directly (sometimes it may take just as long though,
because of all the windows you'll have to wade through to
display the number you want). First we need the Molar
Flowrate of Propylene Oxide entering the reactor.
For that, double-click on the Mixer Out stream
and switch to the Compositions Page. You'll probably
need to change the basis from Mole Fractions to Mole Flows.
Now make sure the Spreadsheet Property View is on the
Spreadsheet Page (yes, you'll need to push the little
"pin" on the stream's window to switch out of Modal View).
Now position your cursor over the 12C3Oxide's Molar Flow and
using the secondary mouse button, drag the
number to cell B2 of the Spreadsheet. You should see
a Bull's Eye when you are over a place you may "drop" it.
Oh, and make sure the Spreadsheet is also not in Modal View
(push the little "pin"). 150.0000 lbm/hr in black
should appear in the cell of the spreadsheet.
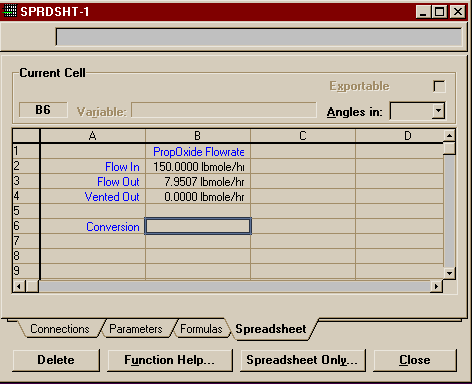
Now repeat this process with the Molar Flowrate of Propylene Oxide of Reactor Prods and Reactor Vent into cells B3 and B4, respectively. Even though the vent is nominally empty, we need to include it on the off chance that some of the reactor contents do become vapourized. With the addition of the appropriate text, your Spreadsheet should now look like this (note, if you place an import incorrectly you must delete it from the Connections Page or using the secondary mouse button menu):
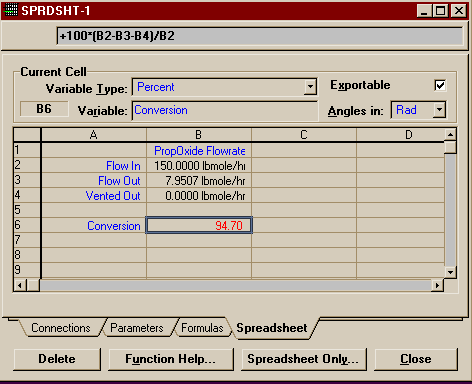
Now, in cell B6, enter the following equation: +100*(B2-B3-B4)/B2. All equations in HYSYS' Spreadsheet must begin either with + or, for certain functions it may begin with, @. For more information on the special functions and logical expressions you may use, press Function Help... or read Section 14.8 of RV2. The 100 multiplier is because we wish to express the conversion as a percentage. Speaking of which, go ahead and add for that cell the Variable Type: Percentage, and the Variable Name: Conversion. That's all we have to do for the Spreadsheet. When you are finished, the page should look like it does below (Note that the conversion, in red because it is a spreadsheet calculated value, is the same as we saw it on the Reactor's Property View). Go ahead and look at the other pages before you close the Spreadsheet window.
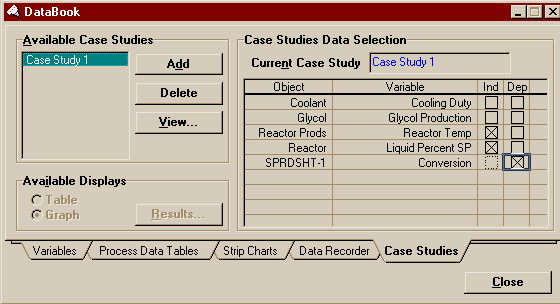
Return to the Variables Page of the DataBook and press Insert... .Pick the Spreadsheet as the Object and B6: Conversion as the variable (go ahead and change the Variable Description at the bottom to just Conversion). Switch to the Case Studies Page. Push Add to create a new Case Study. Remember our goal is to
vary the reactor temperature and reactor size (done here by
varying what percentage of 300 cubic feet need actually be
filled with liquid) and observe the effect on the reactor's
efficiency (i.e. the conversion). Now immediately, you
should see we have a problem executing this plan. The
Liquid Percent Level is not offered as an
independent variable! This is the reason that that is
not the variable we really wanted to use. If we had actually
looked at the Dynamics Page of the Reactor, we would have
seen that the same variable called Liquid Level on the
Reactions Page, was called Liquid Level SP there.
Since it is the same variable, despite the slightly
different nomenclature, HYSYS will change one when it
changes the other. Therefore, that is the variable we truly
wanted. Now we are finally, finally ready to set up the Case Study (normally it is not at all this much of an ordeal). Go back to the Case Studies Page (actually you might first want to make a recording on the Data Recorder Page, as that is a good habit to get into. Remember that HYSYS does not return you to your original settings after completing the Case Study). Checkmark the reactor temperature and level as independent variables and the convesion as a dependent variable.
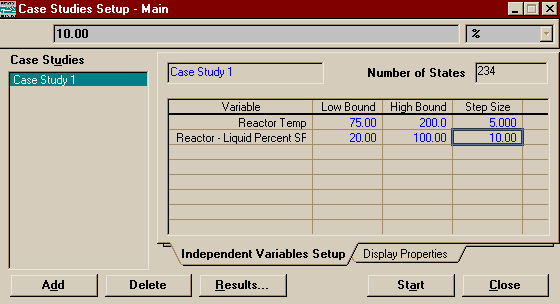
Push View... to open the newly created Case Study's Property View. Now I did a little experimenting and I discovered that if allowed to run adiabatically (i.e. no coolant added), the reactor heats to 235o F. However, you the boiling point of the mixture is around 228o F. This means that if you went so far as to run with no coolant, you would lose product out the vent (never a good thing). Therefore we want our maximum temperature to be less than 228o F. As you shall see 200o F is more than sufficient for an upper bound. For a lower bound on temperature, let us take the first temperature we were given to try in the example, 75o F. Choose a step size of 5o for a nice continuous curve. For the liquid level, varying from 20% to 100% by 10% steps should be more than sufficient.
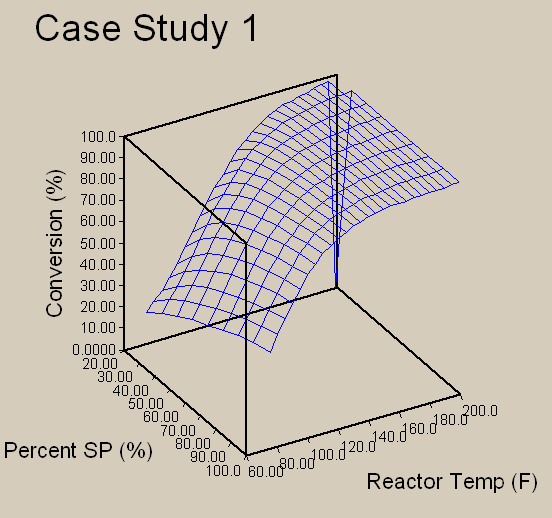
Before pushing start (and you could at this point), there is one thing I would point out to you. If you've worked with Aspen, you've probably done Sensitivity Runs. Where the sensitivity runs only solve as much of the flowsheet as they need to to get all the dependent variables, Case Studies in HYSYS apparently solve the entire flowsheet every time. In this case that would mean running an unnecessary column 234 times (from the Number of States in the upper right corner). To shorten your simultation time enormously, open the column's Property View. On the Parameters Page, checkmark the box that says Ignore column during calculations. The column should turn yellow, and you may close its window. Now press Start on the Case Study. Push the Results... button, and make sure it is set to Graph instead of Table. You should see a nice, pretty 3 dimensional graph of Conversion vs. temperature and size.
You may see one, as in my graph, or even two anamalous points. Don't ask me why, but occaisionally HYSYS screws up somewhat on these Case Studies. When I went back and entered by hand of 200o F and 20% SP, HYSYS still gave me zero, until I walked the SP down from thirty in steps. At that point, HYSYS finally gave me the value 98.10, which it should have been giving me all along. Again, I don't know why, I'm just reporting what I saw and warning you to be aware that the data you get may possibly be buggy. I have always been able to get HYSYS to give the correct answer after a little fiddling, though. Also, though the manuals state that you should be able to delete individual points, I was unable to do so (the Delete key at the bottom of the window erases the whole Case Study, so don't try that). We're done with the example. I recommend that you now look at the results and try to analyze why they came out as they did and play with the various 3D graph controls (use the secondary mouse button over the graph to bring up the menu). A bit of advice, occasionally I have seen HYSYS crash when I tried to get a cross-section (plane cutting) of either XZ or YZ planes. Later, I would come back and it would work just fine from then on, but I recommend saving your work before ever trying that, just in case. You may also want to try a two dimensional case study, Coolant Duty vs. Reactor Temp. It's easy, because the variables are already defined, and it's informative. I have included this second Case Study in my file containing this completed example, CaseEx.hsc in my SAMP403 directory under \\Hartsook\Hysys. |
Return to the Tools Page | Return to the HYSYS Page | Return to the CENG 403 homepage
