 Home
Home
If at first you don't succeed, you are running about average.
M.H. Alderson
Day 2: DNA verification and DNA assembly
Assignments Due
- Synthetic Gene Circuits: Design with Directed Evolution,
E. Haseltine and F. Arnold (Annl
Rev Biophys Biomol Struct 2007,
36:1-19)
- RNA synthetic biology, F. Isaacs et al. (Nat Biotechnol 2006,
24(5):545-554)
- Engineering BioBrick vectors from BioBrick parts, R. Shetty
et al. (Journal
of Biological Engineering 2008, 2:5 doi:10.1186/1754-1611-2-5)
- Homework 1: Synthetic Biology Research Articles for Journal Club Presentation [TEAM assignment: submitted as an "attachment" as
an Assignment in OWL-Space]
Discussion
Overview of Experiment
BioBricks can be joined using standard cloning techniques
and a process called BioBrick
Standard Assembly. After analysis
of the digests from day 1 on a 1% agarose gel, the
digested vector and the
insert DNA are gel purified. The insert
and vector are ligated, and competent bacterial cells
are transformed with the ligation reaction. Transformations
are plated on Luria Bertani (LB) agar plates containing
50 µg/ml ampicillin (Amp).
Background
Agarose gel analysis of restriction digests
Gel casting and running (each team pours two gels):
Caution
 Agarose can become superheated and violently boil over. Exercise caution when heating. Swirl flask occasionally during heating.
Heat until close inspection reveals that the agarose is 100% dissolved. Undissolved agarose will appear as little flecks that look like Lilliputian contact lenses.
Agarose can become superheated and violently boil over. Exercise caution when heating. Swirl flask occasionally during heating.
Heat until close inspection reveals that the agarose is 100% dissolved. Undissolved agarose will appear as little flecks that look like Lilliputian contact lenses.
Health Hazard
Ethidium bromide is a powerful mutagen and is moderately toxic and should be handled with care. WEAR GLOVES when handling contaminated equipment or solutions containing ethidium bromide. Confine the compound to the restricted area. Use plastic wrap to protect equipment and surfaces from being contaminated.
Note: Concentrated ethidium bromide solutions should be decontaminated. One method is to treat 0.5 µg/ml staining solutions of EtBr with 1 g/liter activated charcoal, filter and incinerate the residue. Slurries of activated charcoal can be used to decontaminate surfaces (see Maniatis et al, (1989) for additional methods of decontamination).
|
1. |
Prepare gel tray as diagrammed using an adjustable gel
caster. Level the tray using a bubble level. |
|

|
|
2. |
Flasks of completely melted 1% agarose in 1X
TBE have been prepared and the melted solution is incubating
at 50°C. Carefully pour melted agarose (60 ml)
into a beaker. Remember
the solution is hot!! |
|
|
|
3. |
After the instructor adds EtBr to the gel, gently swirl the agarose. (Let the instructor know when you are ready to add the EtBr to your gel.) |
|
|
|
4. |
Immediately, pour the melted agarose into the level casting
tray. Use a pipet tip to push bubbles towards the
bottom of the gel. |
|
|
|
5. |
Let the tray cool until gel is translucent (takes
at least 20 minutes). CLEAN UP ANY DRIPS ON
THE BENCH AND RINSE THE BEAKER WITH RO-H2O! |
|
|
|
6. |
Prepare samples as described below.
For agarose gels it is advisable to load the same volume into
each well. Some samples may need to be diluted with water or
TE to achieve this. |
|
|
|
7. |
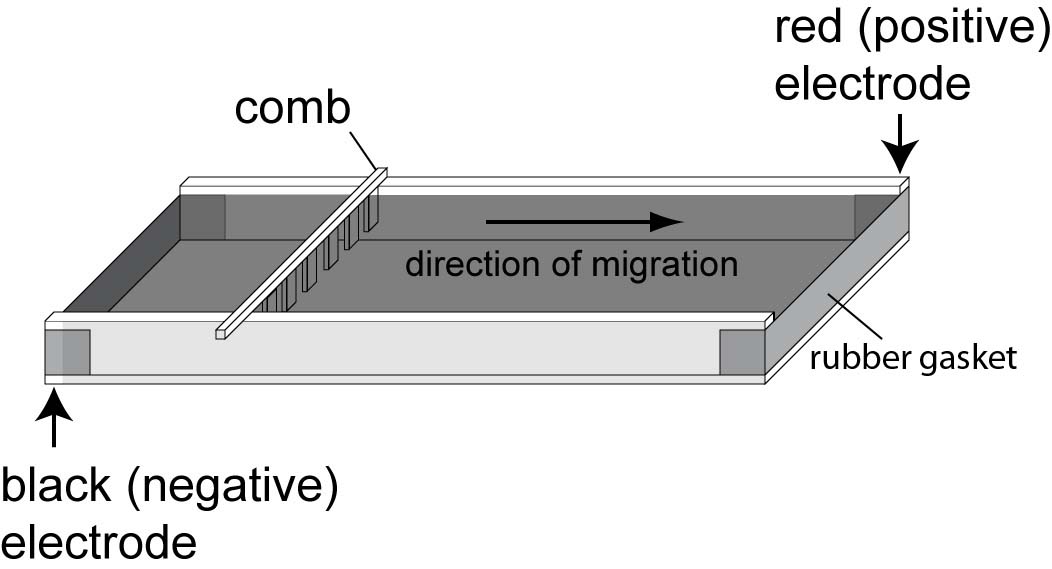
Turn lever on the caster to break the seal. Carefully remove
comb and place casting tray into the electrophoresis box for
running. Fill unit with 1X TBE buffer to ~ 1 mm above
gel. Pour buffer carefully onto the center of the
gel to prevent the gel from sliding off the tray. |
|
|
|
8. |
Carefully load 10 µl of the DNA ladder (see below) into a well; load all of each
plasmid DNA sample into different wells. Record the order of the samples in your notebook. Do not press the tip into the bottom of the well while loading--allow the sample to sink there. |
|
|
|
9. |
Position the lid and connect the electrodes in the correct orientation. |
|
|
|
10. |
Run gel at 130 V for ~ 30 min.
The 500 bp standard will run just behind the dark blue dye front, and smaller fragments that run ahead of the dye may not be visible in this type of analysis.
CAUTION: Lethal voltages are present while the power supply is "ON." Do not touch the gel or buffer until the electrodes are disconnected. |
|
|
|
11. |
WEAR GLOVES. Place casting tray with gel onto a paper
towel and carefully carry to the photography area. DO NOT
spread EtBr outside the designated area!! From this point
forward, assume that your gloves are contaminated with EtBr.
Do not touch anything that is not supposed
to be contaminated.
Re-emphasize: Wear gloves and DO NOT spread EtBr outside the designated area!!
Place gel onto a sheet of plastic wrap on the transilluminator. CAUTION: The gel is still laden with EtBr and should be handled only with gloved hands. Scrupulously avoid all skin contact with the gel. Do not remove the gel from the designated EtBr bench. A waste container is provided there. |
|
|
12. |
Photograph the gel and compare the observed bands to the standards (see below). |
|
|
13. |
Locate the insert and vector DNA
bands on the agarose gel using long wave (>300 nm) UV
light.
Wear safety glasses or a face shield to protect your eyes and
minimize exposure time to skin. |
|
|
14. |
Excise the DNA from the gel using a razor blade or scalpel (use a new one for each piece of DNA; dispose of in a sharps container).
 cut as small a
piece of agarose as possible -- trim off excise gel around the band cut as small a
piece of agarose as possible -- trim off excise gel around the band
|
|
|
15. |
Transfer each gel piece to a sterile 1.5 ml tube;
proceed with gel purification of DNA |
|
Sample preparation:
- Thaw uncut and digested DNA samples from day 1 and pulse
spin
- Add 5 µl 6X loading buffer III (6X LB) to
uncut control, E0840 digest, and digested/phosphatased
R0040
NOTE: 6X LB contains
0.25% bromophenol blue
0.25% xylene cyanol FF
30% glycerol (in water)
[from Sambrook, J., Fritsch, E.F., and Maniatis, T. (1989) Molecular
Cloning: A Laboratory Manual, Second Edition (Cold Spring
Harbor Laboratory Press)]
DNA standards:
Quick-Load® 1
kb DNA Ladder (New England Biolabs, Ipswich,
MA): load 10 µl (0.5 µg) per lane
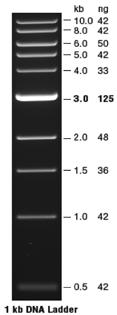
- Record this information in your notebook and include both sizes
(in bp) and mass of ladder fragments.
- This ladder can be used to quantitate the amount of DNA in
a sample; the mass of DNA in each band in the ladder has been
calibrated (the 3,001 bp fragment has increased intensity to
serve as a reference band)
Expected products:
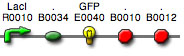
BBa_R0040 (promoter/tetR
repressible, in pSB1A2, AmpR)
- Uncut control = circular (cannot estimate
size)
- SpeI / PstI digest = ~ 2100
bp (small spacer between enzyme sites is removed)
BBa_E0840 (GFP
reporter with strong RBS, in pSB1A2, AmpR)
- XbaI / PstI digest =
2079 bp, 878 bp
UVP BioDoc-It™ System
System Components
- CCD Video Camera
- Zoom Lens
- UV Blocking Filter--the orange-colored filter absorbs UV and IR radiation from the transilluminator and enhances the orange/pink bands of ethidium bromide stained gels
- Transilluminator (302 nm)
- Darkroom Cabinet
- LCD Monitor
- Thermal Printer
Avoid doing anything that would intentionally contaminate the transilluminator or camera with EtBr. For instance, do not lay gels directly on the transilluminator, but always on plastic wrap. Do NOT contaminate the equipment (door knob, camera, printer, etc.)--REMOVE your gloves BEFORE working with the camera and gel documentation system.
- Position the gel in the center of the UV transluminator and smooth out the wrinkles in the plastic wrap.
- Close the darkroom cabinet's door and turn on the transilluminator.
NOTE: the transilluminator will cut off if the darkroom door is opened.
- If the image on the LCD screen is dim, press the "+" button on the keypad controller; each time the "+" button
is pressed, the CCD camera is set to the next increasing
exposure time (there are 17 steps from 0.1 sec to
10 sec).
NOTE: For more detail but a gray background, increase exposure time; for less detail and black background, decrease exposure time.
- Rotate the zoom adjustment (MIDDLE ring) on the lens so that the image is the appropriate size.
- Press the "Capture" button to hold the image
on the screen.
- Press "Print" on the thermal printer in
order to print the image; press AND hold
copy/feed to advance the paper to cut the
picture.
Dispose of the gels in the Biohazard Waste Box.
Do NOT put paper towels, plastic wrap, or gloves in this waste box--ONLY the gels.
Gel purification of digested DNA
For the E0840 digest, we want only the 878 bp insert band; for
the digested and phosphatase-treated R0040, we want only the
cut vector (i.e., we do not want any uncut plasmid carrying over
into the ligation reaction). After cutting out the pieces of
agarose containing the appropriate DNA bands, the agarose is
melted and the DNA is recovered using a mini spin column.
PROTOCOL (adapted from Zymoclean
Gel DNA Recovery Kit™):
- Pulse spin for ~ 10 sec to "pellet" the agarose
piece containing the insert band from E0840 and the piece
containing the vector band from R0040 (for
estimation of gel volume)
- Add 3 volumes of ADB Buffer™ to each volume of excised agarose
- Incubate at
50-55°C until the agarose is completely dissolved (5-10
minutes)
- Add the melted agarose solution to a spin column in a collection
tube
- Centrifuge at 16,000 x g for 30 seconds and discard column
flow-through
- Add 200 µl wash buffer (contains
ethanol) and centrifuge as in step 5 (do not discard flow-through)
- Repeat the wash and centrifuge as in step 5
- Discard flow-through and centrifuge at 16,000 x g for
an additional 30 seconds to remove the last drop of wash
from the column (residual ethanol will inhibit DNA elution)
- Put column
in a sterile 1.5 ml tube
- Add 10 mM Tris-HCl, pH
8.5, 0.1 mM EDTA (same components as Zyppy™ Elution
Buffer)
to center of column
- 10 µl for insert
- 15 µl for vector
- Centrifuge at 16, 000 x g for 30
seconds to elute DNA
***The gel-purified DNA can be used directly in ligations, digests, PCR, etc.***
- Proceed to DNA ligation
DNA ligation
- A 2:1 or 3:1 molar ratio of insert:vector DNA is generally
recommended when subcloning a DNA fragment into a plasmid
vector
- Typical
ligation reactions use 25-100 ng of vector DNA
- Molar
ratios are converted to mass ratios using this formula:
[(ng vector x kb size of insert) / kb size of vector]
x (molar ratio of insert / vector) = ng of insert
Vector: SpeI / PstI digested BBa_R0040,
~2100 bp
Insert: 878 bp fragment from XbaI / PstI digest
of BBa_E0840
A. Estimation of concentrations of insert and vector
If a DNA sample is too dilute to measure at 260 nm or
is contaminated with other compounds that absorb in
the UV range, the amount of DNA present can be estimated from
the intensity of ethidium bromide fluorescence. Since the amount
of DNA in a solution is proportional to the fluorescence emitted
by ethidium bromide, the DNA quantity in an "unknown" solution
can be estimated by comparing its level of fluorescence with
the intensity of known amounts of DNA.
You need to estimate concentration of the gel-purified
insert and vector fragments. Compare
the intensity of the "unknown" DNA (e.g., 2X as bright)
to a band in the 1 kb ladder to estimate the DNA concentration
of your sample (ng of DNA for each size standard are given
in the Table on the manufacturer's insert). Consider the
initial volume that contained the DNA; the volume loaded onto
the gel is not critical to your calculation of concentration
- Preparation of samples:
a. Put 2 µl digested/phosphatased/gel-purified vector
or 2 µl
gel-purified insert in
a sterile tube
b. Add 8 µl NF-water
c. Add 2 µl 6X LB
- Load all of each sample into the mini gel and load 1 kb
DNA ladder (10 µl)
- Run a 1% agarose gel at 130 V for 20-30
min
- Photograph the gel
- Compare the relative intensity of staining of
the unknown with a comparably sized band in the
1 kb ladder and estimate the DNA concentration
of your original samples
B. Protocol from Quick
Ligation™ Kit (New England Biolabs):
- Thaw 2X Quick Ligation Reaction Buffer (2X QLRB) [132 mM
Tris-HCl, pH 7.6 @ 25°C; 20 mM MgCl2; 2 mM DTT; 2
mM ATP; 15% polyethylene glycol (PEG 6000)] ON ICE and mix
thoroughly; the ligase buffer contains ATP and Mg2+ necessary
for the reaction
- Set up TWO ligation reactions in 1.5 ml tubes (per team):
- R0040+E0840 = combine ~50 ng vector
DNA with a 3-fold molar excess of insert DNA (see formula above);
adjust volume to 10 µl with NF H2O
- NEGATIVE control = combine 1 µl
digested/phosphatased/gel-purified vector DNA with 9 µl
NF H2O
[phosphatased vector
should not be able to ligate to itself BUT the phosphatase treatment may not be 100%]
- Add 10 µl of 2X QLRB to each reaction and mix thoroughly
- Add 1 µl
of Quick T4 DNA Ligase (lig) to each reaction and mix thoroughly
- Centrifuge brielfy and incubate the reactions at room temperature
for 5 min
- Chill on ice and proceed to transformation
Bacterial transformation of E. coli
To amplify plasmid DNA for manipulation and analysis, we are
going to transform bacteria with the ligation reaction.
The cell strains we use are either sensitive (S) or resistant
(R) to the antibiotic tetracycline (Tet); these cells were harvested
at early - mid log phase and were made competent for transformation
(Z-Competent™ cells
were prepared by the instructor according to the manufacturer’s
protocol).
Keep in mind that transformation efficiency when using
ligated DNA is greatly reduced compared with using plasmid DNA.
Several
control transformations are performed today:
1) plasmid DNA = ensures
competent cells are good
2) digested/phosphatased/gel-purified
vector ONLY = gives "background" for UNCUT vector
3) digested/phosphatased/gel-purified
vector PLUS ligase = gives "background" for
vector recircularization
PROTOCOL [adapted from the Z-Competent™ E.
coli Transformation Kit & Buffer Set (Zymo Research
Corp., Orange, CA)]:
- Obtain 0.1 ml aliquots of “Z-Competent™” TetS
strain (GNB8385K) or TetR strain (GNB824) cells
and place on ice
You
must be extremely gentle when working with competent cells.
These cells are highly sensitive to temperature changes
and/or mechanical lysis. Mix cells by gently tapping the
tube or swirling with a pipet tip, not by pipetting up & down
or vortexing.
- After cells thaw, as a team, prepare the following transformations:
- (-) R0040 ONLY =
add 1 µl
digested/phosphatased/gel-purified
vector to 100 µl Z-Competent™ cells
- (-) R0040 plus ligase ligation =
add 5 µl ligation reaction
to 100 µl Z-Competent™ cells
- R0040+E0840 ligation =
add 5 µl ligation reaction
to 100 µl Z-Competent™ cells
Three teams should perform the positive control transformation:
- (+) plasmid DNA =
add 1 µl
(~100
ng/µl) BBa_I13522 (strong
constitutive production of green fluorescent
protein (RFP), in pSB1A2, AmpR) plasmid DNA to 100 µl Z-Competent™ cells
- Mix gently and incubate samples on ice for 5 minutes
- Pipet 100 µl of the (+) plasmid DNA transformation
onto an LB-Amp (50 µg/ml) plate (prewarmed to
37°C)
- Pour 10 - 20 sterile solid glass beads onto the plate,
set the plate on the benchtop, and "shake" plate
back and forth on the bench top for a few seconds; invert
plate to pour off beads (collect in a large beaker --
these can be cleaned, autoclaved, and reused)
- Pipet 100 µl of the (-) R0040 ONLY transformation
on a 2nd LB-Amp plate (prewarmed to 37°C)
- REPEAT step 5
- Pipet 100 µl of the (-) R0040 plus ligase transformation
onto a 3rd LB-Amp plate (prewarmed to 37°C)
- REPEAT step 5
- Pipet 100 µl of the R0040+E0840 transformation
onto a 4th LB-Amp plate (prewarmed to 37°C)
- REPEAT step 5
- Let the plates sit 5 minutes at room temperature so that
the liquid absorbs into the agar
- Incubate the plates (upside down) overnight at 37°C
Copyright, Acknowledgements,
and Intended Use
Created by B. Beason (bbeason@rice.edu), Rice University, 21 November 2007
Updated 3 July 2014