 Home
Home
Many of life's failures are people who did not realize
how close they were to success when they gave up.
Thomas Edison
Day 4: DNA Verification
Assignments Due
- Sniffers, buzzers, toggles and blinkers:
dynamics of regulatory and signaling pathways in the cell, J. Tyson et al.
(Curr
Opin Cell Biol 2003,15:221-231)
- Quantitative Modeling in Cell Biology: What Is
It Good for? A. Mogilner et al. (Developmental Cell 2006,
11:279-287)
- Automated design of synthetic ribosome binding sites to
control protein expression, H. Salis et al. (Nature Biotechnology
2009, 27(10): 946-951)
Pre-lab
- Joff Silberg:
Directed Evolution: Using Mutation and Screening to Create
Novel Proteins
- The Secret Life of Lines & Circles
- Team Brainstorming Session
Overview of Experiment
In today's lab, you analyze the PCR reactions for the colony
screen on an agarose gel.
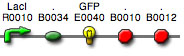
You also perform a mini prep as on lab day 1 to isolate plasmid
DNA from a transformed colony (BBa_I13522: pTetR-GFP); you will use
this DNA in a PCR reaction on lab day 5 to mutate the ribosomal
binding site for expression of GFP.
Agarose gel analysis of PCR products
- Prepare a mini 1% agarose gel with one 8-well comb (use
~40 ml molten agarose) as on Day 2 [pour one gel per team]
- Load 5 µl of each PCR reaction into the gel, alongside 10 µl 1 kb DNA ladder
- Run the gel at 130 V for ~20 min
- Photograph the gel and compare the observed bands to the standards
- Did you get the expected size products?
Expected products for colony screen:
- Negative control = NO bands
- BBa_R0040 =
292 bp
- BBa_E08400 =
1218 bp
- R0040+E0840 (colony PCR) = ~ 1200 bp
Plasmid DNA Mini Prep
- Isolate plasmid DNA from BBa_I13522 as
on Day 1
and store sample at -20°C
Copyright, Acknowledgements,
and Intended Use
Created by B. Beason (bbeason@rice.edu),
Rice University, 21 November 2007
Updated 6 November 2013