 Home
Home
The hardest thing to learn in life is
which bridge to cross and which to burn.-
David Russell
Day 4: Anion Exchange Chromatography
Assignments Due
- Bring your team "Protein Purification Reference" (see the instructions on Day 3 and in OWL-Space Assignments) to
the 4th Monday class meeting; submit your information at the end of class.
- Plagiarism
- Writing Lab Reports and Research Papers: Materials and Methods (McMillan, 5th ed.:
pp. 61-62, 71-76) and Drafting and Revising
(McMillan, 5th ed.:
pp. 144-149, 151-171)
- Methods for measuring protein concentration (Scopes 2nd ed. pp. 278-283; 3rd ed. pp. 44-50)
- Study Guide (bring a copy of this to lab)
- Canvas Files:
BIOC 311 Resources(review before
Monday discussion)
- [Plagiarism]
- [Writing Resources]
- 144Errors_Handout.pdf
- 145Numbers_HandoutR.pdf
- Template for taking notes.pdf
- Model paper from "Protein Expression and Purification"
Preparation
- Research
Paper overview and Plagiarism
- Writing the Materials and Methods
- Anion exchange chromatography (set-up of system)
- Protein Purification Tables
Overview of Experiment
Run ion exchange columns using a salt gradient to elute adenosine
deaminase. Complete all the measurements needed to complete
a purification table for your enzyme preparation including
activity measurements for all stored samples and the Q-cartridge
fractions. Determine protein concentrations for Q fractions.
Procedures
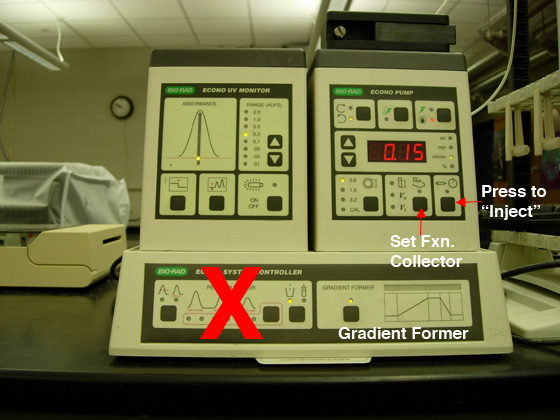
The chromatography systems have been plumbed for running the
ion exchange cartridge. All components of the station will
be used except for the "peak collection" option, marked with
the red "X" (see Fig. 1). Each team
will share an instrument. The same conditions should be used
for both native and recombinant preparations and the samples
will be run sequentially. Construct a 0.5 M salt buffer (250
ml is sufficient volume): add salt to your anion exchange buffer.
 |
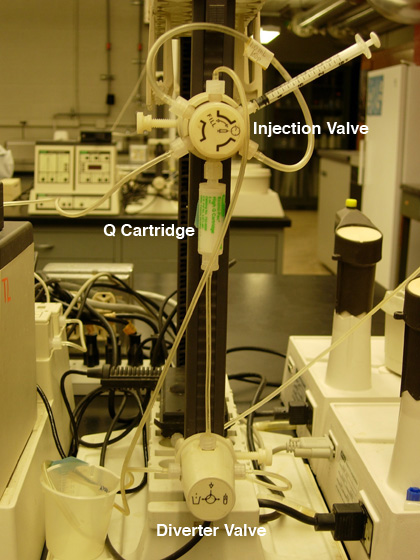 |
Fig. 1. A) Pump settings for anion exchange
chromatography. |
B) Q cartridge hook-up. |
Preparation of Sample
- Wearing gloves, rinse the outside of the dialysis tubing with RO water.
- Recover the residue from the dialysis tubing with a MINIMUM
of anion exchange buffer.
A total final volume of less than
1 ml is recommended. Achieve a more quantitative recovery by
rinsing the tubing with more than one addition of fresh buffer
(e.g., three rinses with 0.3 ml or two rinses with 0.5 ml are
better than one addition of 1 ml).
- Mix the recovered suspension
well to dissolve the residue.
- Centrifuge in a 1.5 ml tube for
5 minutes at maximum speed to pellet any insoluble material.
- Using a 1 ml syringe, filter the supernatant through a
0.45 µm
filter into
a clean 1.5 ml tube.
The sample is ready for loading onto the Q cartridge.
Caution: Do not shake to cause foaming while attempting
to dissolve the material. Foaming indicates the presence of
denatured protein that will act as a detergent to denature
even more protein.
Preparation of High-Salt Buffer
- Prepare 250 ml of 0.5 M salt in anion exchange buffer =
high-salt buffer
Q Cartridge Set-Up: Bio-Scale™ Mini Macro-Prep® High Q Cartridge,
5 ml (Bio-Rad Laboratories, Hercules, CA)
NOTE: Use ONE pump station per team and run columns sequentially. Use
ONLY the "slow-running man" when operating the pump
today (i.e., do NOT ever use the "fast-running man" =
purge).
- Install loading (anion exchange buffer) and eluting (anion
exchange buffer + high-salt) buffers in the chromatography
system (Fig.
2). Buffer "A" is
anion exchange buffer (loading buffer) and Buffer "B" is
anion exchange buffer plus 0.5 M salt (eluting buffer). NOTE:
the pump tubing diameter is 1.6 mm.
By DEFAULT, the pump pulls through the Buffer A line;
to switch between buffers A and B, press the "Gradient Former" button
while the pump is running.
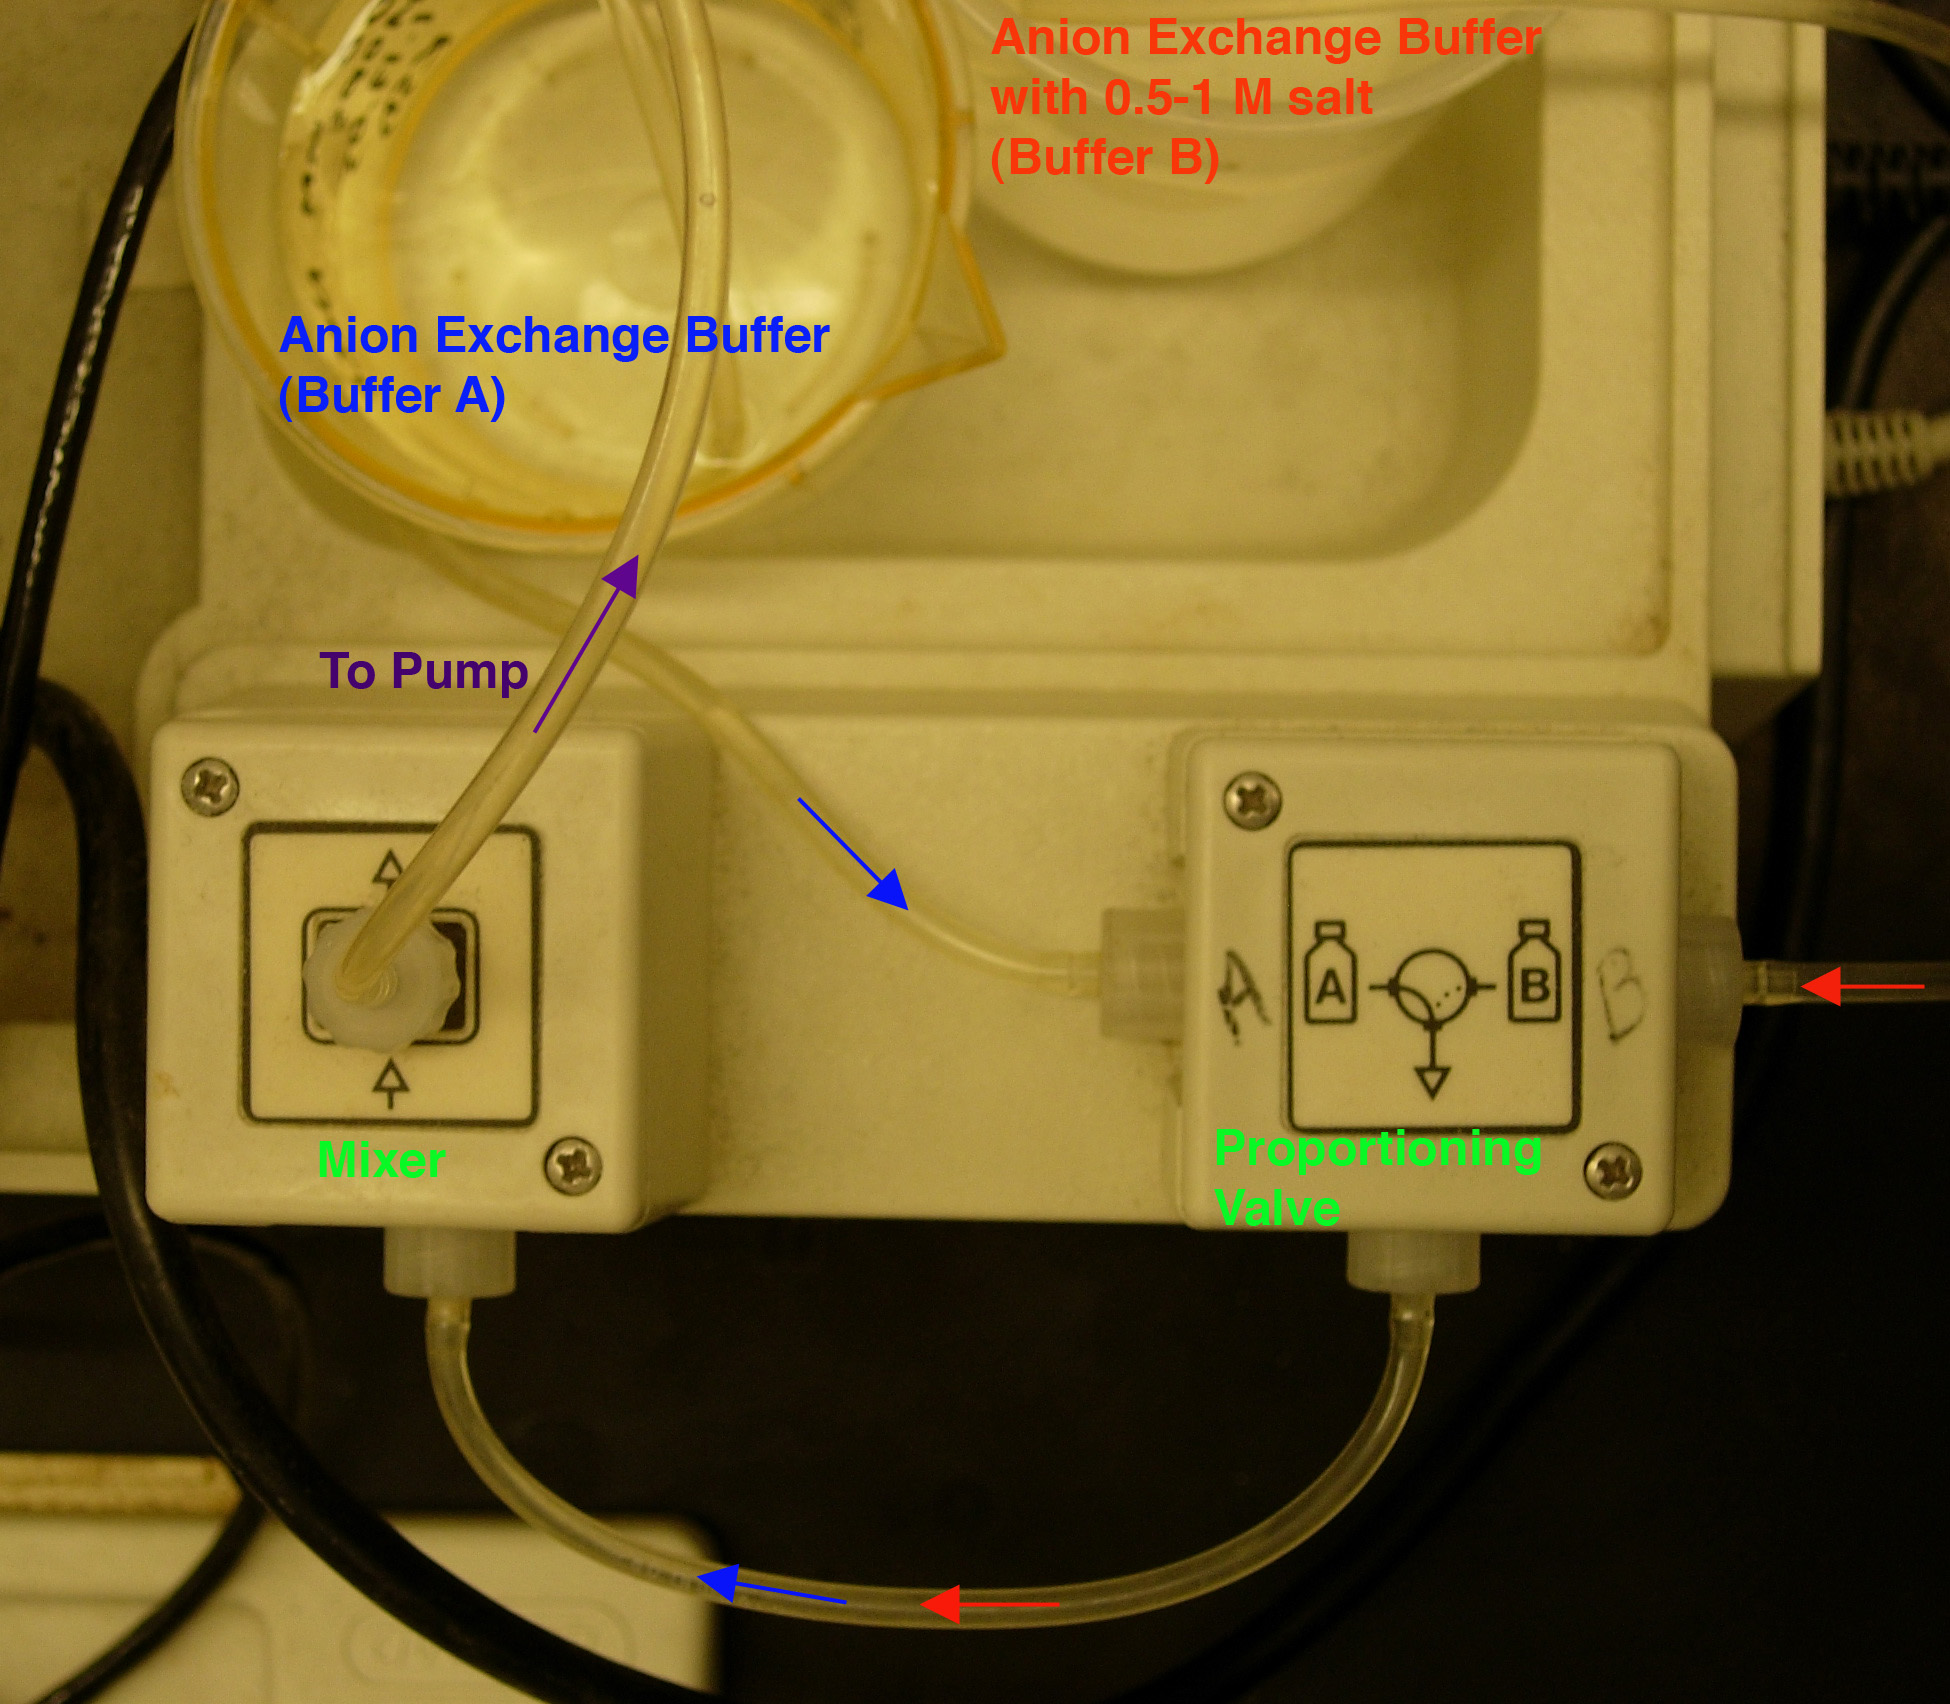
Fig. 2. Buffer set-up.
- Set the flow rate to 6 ml/min.
- Disconnect the top of
the Q cartridge from
the system and flush the lines with both buffers (this
step will only take a few seconds).
- Reconnect the Q cartridge and at a flow rate of 6 ml/min
a) wash with Buffer B (eluting buffer) for 5
min.
b) wash with Buffer A (loading buffer) for 5 min.
The column is now equilibrated in your loading buffer.
c) Reduce the flow rate to that which will be used for the
purification.
d) Between sample loadings, at 6 ml/min, wash with 0.5 M salt
buffer for 5 min followed by loading buffer for 5 min.
Remember to return to the desired flow rate before loading the second sample.
e) After the second run, regenerate the cartridge by washing
with 0.5 M salt buffer for 5 min at 6 ml/min.
- Set the flow rate for your run; Bio-Rad recommends
2.5 ml/min for the 5 ml Q cartridges.
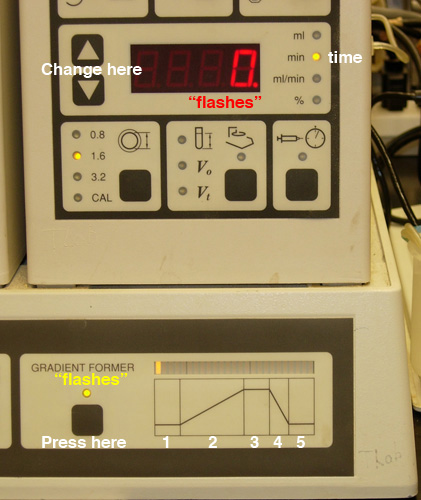
- Program a gradient of no more than 30 minutes TOTAL elapsed
time (Fig.
3).
 |
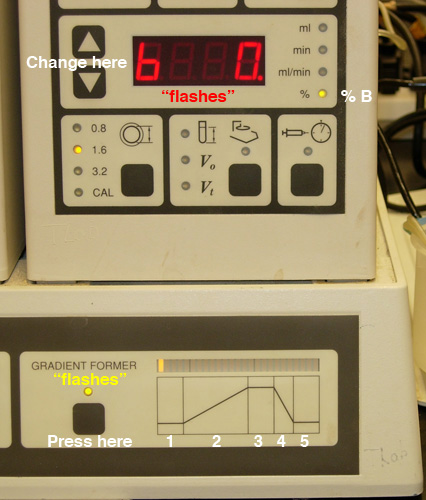 |
Fig.
3. Setting the gradient: A) Selection of "time" for
a given step. |
B) Selection of "% b" (Buffer B) for a given step. |
- Set the fraction
volume ("test tube") to 3 ml using the
pump (*you do not need to set Vo, Vt, or # fractions) and
put 25 plastic tubes into the fraction collector carousel
NOTE: Make sure you see a "dashed, red line" on the fraction
collector LED (see Fig. 4).
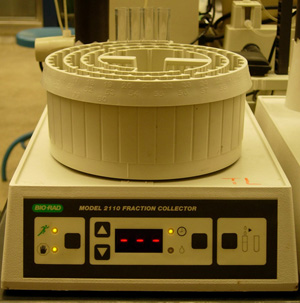
Fig. 4. Appearance of the fraction collector when it's
controlled by the pump.
- Set the UV monitor: select 0.02 for RANGE;
ZERO the monitor as on day 3.
- Activate the pump (turn "on" using the slow running
man)
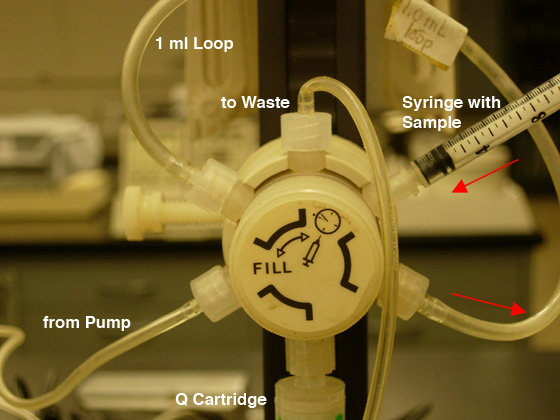
- Be certain the injection valve is in the "Fill" position (CCW) then
load your sample into the injection loop (maximum of 1.3 ml)
using the syringe (see Fig. 5A).
DO NOT REMOVE THE SYRINGE FROM THE PORT!!
- Check that the fraction collector is ready and the chart
recorder is on; then move the injection valve to the "Inject" position (CW),
and push the blinking "Inject" button to
start the gradient (see Fig. 5B).
 |
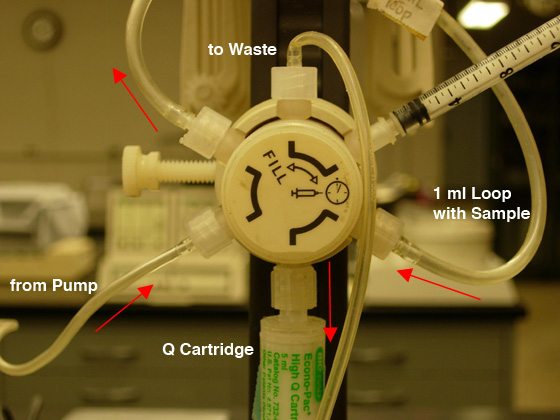 |
Fig.
5. Sample loading: A) FILL the LOOP (CCW position).
|
B) INJECT the COLUMN (CW position). |
Observe that the sample is being rinsed into the cartridge and that the fraction collector is started.
Monitor the progress through the first two or three tubes to be certain of function and alignment of the fraction collector.
- Use the Qualitative Spectrophometric Assay for ADA Activity (SAME as on Day 3) to find the ADA activity in your fractions.
*YOU MUST USE THE SPECTRONIC GENESYS 5 SPEC'S FOR THIS ASSAY.
**ASSAY ALL FRACTIONS!
- Combine the active fractions and obtain an A280
reading for the combined fraction as you did on Day 3;
this value will be used to determine protein concentration. What
buffer do you use to AUTO ZERO the spec?
SAVE YOUR PROTEIN SOLUTION!!
- Use the ADA activity spectrophotometric assay at
265 nm, as used on Day
1, to obtain QUANTITATIVE
assessment of the activity in each pooled Q fraction.
- Add necessary components for stability (e.g., glycerol, DTT,
beta-mercaptoethanol, sucrose, EDTA) to the final purified
enzyme fraction.
NOTE: 0.5 M EDTA and 1 M DTT stock solutios
have been prepared for your use; you do not need to weigh out
these additives.
- Store final purified enzyme fraction in labeled 5 ml tubes
with screw caps at either 4°C or -20°C.
NOTE: set aside 50µl of your Q fraction for desalting
(see procedure below).
Quantitative ADA Assay
Use the ADA activity spectrophotometric assay at
265 nm, as used on Day
1, to obtain QUANTITATIVE assessment of the activity
in EACH STEP of the purification (NOTE: you do NOT
need to use a CONTROL enzyme). Thaw the aliquots from past
steps and keep them on ice. Some samples may have too much
activity to measure even using only 1 µl. Be prepared
to dilute a small fraction of the aliquot to add
at least 10 µl to the assay for the activity
measurement; do NOT dilute ALL of the fraction aliquots.
On the other hand, some samples may have very little activity
in just 20 µl; you may add up to 100 µl of
fraction in the assay.
Obtain activity measurements for crude fraction,
P-60 fraction, and Q fraction for BOTH native and recombinant
sources:
- The measurements should be linear and in the range
of -0.02 to -0.06 ΔA/min
- CE must be diluted--first try 1:10 for NATIVE
and 1:100 for RECOMBINANT
- Try undiluted P-60 and Q first; dilute only
if necessary
- Remember to save the remainder of all the UNDILUTED
samples for gel and kinetic analyses; DISCARD any diluted
samples and leftover adenosine
NOTE: PERFORM THESE ASSAYS WHILE THE Q CARTRIDGES ARE RUNNING
Desalting of Q Fraction for SDS-PAGE
All samples need to be in similar buffer prior to loading
the SDS-PAGE gel (in a subsequent lab).
The buffer composition of the Q fraction must be changed; the
sample will be desalted using small columns equilibrated in
Tris/glycine/SDS (25 mM Tris, pH 8.3, 192 mM glycine, 0.1%
SDS) running buffer.
Quick method for changing buffers of samples for SDS gels:
- Obtain an Ultrafree (0.22 µm) device for
each sample to be processed and insert the column into a 1.5
ml centrifuge tube.
- Using a disposable transfer pipet, fill the upper portion
of the Ultrafree device with a slurry of G-25 beads (about
400 µl).
- Pulse spin (hold the "SHORT" key on the microcentrifuge)
for ~15 seconds in the microfuge to remove excess water; discard
the flow-through (waste water).
- Add 100-200 µl of Tris/glycine/SDS (25 mM Tris, pH
8.3, 192 mM glycine, 0.1% SDS) running buffer to the gel material
and let stand for 1-2 minutes.
- Remove the excess buffer with a 15-20 second pulse spin.
- Carefully pipet 50 µl of your Q fraction on the gel
material and let stand 2-5 minutes at room temperature.
- Recover the sample in a clean 1.5 ml microcentrifuge
tube with
a 10 second pulse spin.
The sample will be in an acceptably desalted state.
- Store the sample at -20°C (*do NOT put "loose" tubes
in the freezer--use a screw-cap bottle).
- Rinse out the beads with RO water and RETURN the Ultrafree
device to the container.
Copyright, Acknowledgements,
and Intended Use
Created by B. Beason (bbeason@rice.edu), Rice University, 15 June 1999
Updated 12 September 201