![]()
LEGOizing Motor Shafts
![]()
![]()
![]()
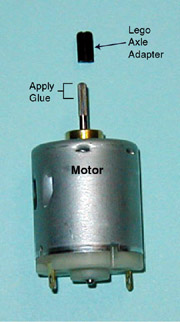

The New Method-- Motor shafts are LEGOized by attaching a LEGO axle adapter: a 1-unit long piece of axle that has a hole drilled into it to fit the motor shaft. The procedure is:
- Select the correct adapter. Different motors have different size shafts and require different adapters. Be sure you have the correct one; ask a labbie.
- Clean the motor shaft. If it is new and knurled, just wipe it with some alcohol. If it smooth, or has had glue or shrink tubing on it, sand it lightly with fine sandpaper to get it really clean. Hold the motor shaft down to avoid getting grit in the bearing! Then wipe clean with alcohol. Clean is good.
- Apply glue to the end of the shaft. Use Locktite 409 instant adhesive (super glue gel) or epoxy to just the end of the shaft, about 1/4 inch, all around the circumference. Keep glue away from the motor bearing!
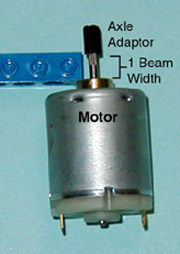
- Push the adapter onto the
shaft. The idea is to push the adapter on the shaft just enough so it
will clear the the thickness of a LEGO beam. This will avoid friction between
the adapter and the beam. (For plate-mounted motors, substitute plate
for beam below.)
- Have your partner hold the motor upright
- Put a LEGO beam over the shaft, so the shaft goes through a beam hole, and the beam is flat on the motor bushing.
- Hold the adapter with pliers, and put it on the shaft; you may need to tap it lightly.
- Push/tap the adapter down until the base just touches the beam surface. See the picture at left to see the spacing. (For visibility, the shaft does not go through the beam in this picture.)
- Double check that there is no glue near the motor bearing.
- Let the glue set. A minute or so for Locktite, 10 minutes or so for epoxy.
- Ready to use! Since the adapter fits through a beam hole, you can remove the beam used for spacing, and mount the motor as needed on a beam, etc., then add the gear of your choice.
Reference Information for Making Adapters.
|
Motor
|
Adapter
Drill
|
Drill
Diameter
|
| Johnson Flat Sides |
#47
|
0.0785"
= 1.99mm
|
|
Johnson 31348 Johnson 30029 |
#42
|
0.0935"
= 2.37mm
|
| Johnson 3520 (old) |
#43
|
0.0890"
= 2.26mm
|
The holes must be on center, especially the #42 drill, to avoid broaching through the side of the axle. This requires a precision small drill press and an X-Y micrometer stage to position the adapter (and good eyes or a magnifier). I hold a 2-long LEGO axle in a 40-tooth gear bolted to the stage, drill through it, and then slice it in half using a utility knife blade to make two adapters. Use two beams to hold the axle, with the blade between the beams; whap the blade with a small hammer.