| |
Poster
Design Guide
1. General
Information About Poster Sessions
2. Analyzing Your Audiences
3. Showcasing the NEWS about Your Topic
4. Visualizing the “NEWS” in the Design Space
5. Creating Coherence
6. Option: Using a Template
7. Applying Poster Style to the Text
8. Printing Your Poster
9. Preparing a Handout
10. Developing Expertise with Feedback
|
| |
A
Guide to Preparing a Poster
A poster must:
- meet
physical requirements determined by the session organizers,
- present
your IDEA about the topic and show why it is interesting
and important
Designing
a poster is a challenge because space is limited. It must
be lean and clean, standing alone if you are not present,
and gain attention as audiences come and go.
1. General
Information about Poster Sessions
Poster sessions are held as part of professional conferences, trade shows,
job fairs, and university courses or end-of-semester campus shows. Posters
of a predetermined size are displayed in a large area, and the audience
moves about as it chooses; presenters stand near their posters and explain
them briefly or answer questions. Poster sessions enable people to seek
information about new work with convenience and freedom in a short period
of time, a kind of cafeteria of information. Today's software programs
enable novices to prepare exciting, informative posters. Students as
well as professionals can participate in poster sessions. The "Resources" link
at the Cain Project web site can help you find specific answers to your
questions--such as, "How do I print my poster?"-- or help you
learn about the challenges in designing a poster.
The physical setting of a poster session sets the rules, especially the
size and materials you use in your poster. If large 8'x4' plywood
boards on frames will be used for poster display, you can make a
much larger poster than if the hall will have lightweight easels
that can hold 2'x3' cardboard posters. So pay attention to the rules
for your poster session: if the rules say tape can be used to secure
the poster to the frame, bring tape, not pushpins. However, sometimes
circumstances may shift after the time a session is announced; it
is good to bring a small kit along with other materials such as tacks,
Velcro tabs, push-pins, and masking tape or display clay to adapt
your poster to the situation.
A poster session's location makes travel or shipping part of the design
requirements. If a presenter must travel on a plane, a container
will be needed to protect the poster in transit. Poster tubes can
be purchased for around $2.00 to protect your poster duing transport.
Presenting at a poster sessions differs from giving other kinds of presentations.
The audience comes and goes, so the presenter must constantly adapt
to the viewers who are present. Some will want an oral explanation;
some will merely want to look for a few seconds. Prepare several
versions of your remarks, from 30 seconds to 4 minutes (Presenting
Your Poster).
Poster sessions are usually scheduled for particular hours, and presenters
may be asked to be present at specific times to be near the displays.
However, the display hall may be open at other times, too; it's a
good idea to make sure a poster can communicate well without the
presenter being there. It is crucial to know what materials are allowed,
what physical dimensions the poster can be, what display methods
will be available (tape, tacks, or Velcro), when the poster must
be put up and taken down, and how transporting the poster to the
conference or presentation site might affect success. Take along
tape, scissors, extra tacks or pushpins, and a packet of Velcro tabs
(available from a sewing, fabric, or crafts shop). Also check on
the physical constraints involved in using the computer: both printers
and software have size limits.
Back
to top
|
| |
2. Analyzing
Your Audiences
Characterizing
your audience during initial poster planning enables you to better
tailor its content and design elements to those you wish to reach.
The audience for the CHEM 215/217 session, for example, will
include your fellow students, your instructors, someone from
the Cain Project, and other invited guests. They have different
levels of knowledge and different interests.
- The instructors
and guests will be more expert than you are in organic chemistry.
Their questions will be more technical. They want to know
you thoroughly understand the mechanisms you describe.
- Your fellow
students will be interested, but their questions will probably
be more basic.
- The Cain
instructors may ask you design questions about your principal
point, your design choices, and your process.
These different
audience types will affect your content and design decisions:
- What critical
concepts/terms/issues will need to be defined for each audience?
?
- What visual
aids (tables, graphs, and so on) can be used to convey information
to audience members with a wide range of research interests
and experiences?
- What questions
can you anticipate audience members having about the information
conveyed in your poster?
- What questions
do YOU want to answer for these people?
- What organic
transformations are relevant to your purposes?
- What is
especially interesting or perhaps unexpected about these
transformations?
- What have
you studied in lab or in class that would help the viewers
gain a foundation for understanding the transformations you
wish to present?
- What colors
or designs are relevant to these compounds or processes?
- What applications
or products are related to these transformations?
- What experiences
or values would the audience connect to these products and
processes?
Thinking
about the questions above will help you showcase the "NEWS" in
your presentation.
Back
to top
|
| |
3. Showcasing
the "NEWS" in your Topic
The poster design process moves quickly when you take time to make some
early decisions:
- What's
the NEWS? What did you find out that you want to share with
others?
- How can
the overall arrangement of the poster signal the news?
- How can
all the elements reinforce the main idea?
- What will
make the reader stop and look?
To select the
content for your poster, you must cull the most essential information
from the wealth of knowledge you've gained. It's psychologically
hard, but you can't use EVERYTHING. You want to select the crucial
support for “The News.” You can rank the information
into three categories:
- MUST
know (to get the point)
(This includes the three-step transformation or the alternatives--one
two-step process plus a single-step process, OR three one-step processes,
hazards, etc.)
- Good
to know (equipment, size, volume, world production,
and so on)
- Nice
to know (perhaps historical or social context, cost,
unexpected effects)
You should
include the MUST, add some Good, and save “Nice” details
for talking with your audience or for a handout you'll give
them.
Back
to top
|
| |
4. Visualizing
the “NEWS” in the Design Space
The point of design is to make “The News” accessible and easy
to process by the audience, that strolling, fickle group of individuals
whose eyes are darting back and forth across the room. Help them get
the point of your poster with a commanding, large font title. Include
an introductory summary. Use message headings and forecasting statements
to introduce or sum up each section. Reduce jargon--people avoid things
they can't understand.
Choosing an overall layout appropriate to the main point of your topic
is the most important step.
Think of a quilt.
It's big and rectangular, and right away you notice a pattern. Similarly,
a poster should have a suggestive arrangement of communication areas.
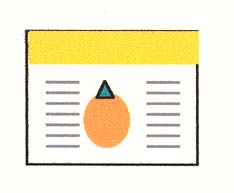
Three of the basic news arrangements are horizontal areas, vertical areas,
centered images. Use your answers to the questions above to relate the
NEWS to a spatial layout that leads the audience's eyes through your
NEWS. Some of your choices are:
- left-to-right
flow in vertical columns
- two fields
in contrast
- left-to-right
flow in horizontal rows
- a centered
image with explanations
These are suggested
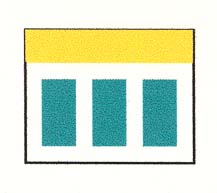
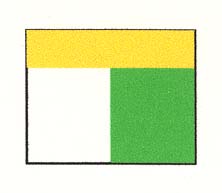
in the following thumbnail shapes.
This is the
most challenging part of design: matching the physical pattern
of the layout with the intellectual pattern of your NEWS.
- What are
you trying to show the audience?
- Is it
a problem and a solution?
- Is it
an image, for example, of a device or chemical reaction?
- Is it
a contrast? (old vs. new, before and after)
- Is it
a demonstration?
- A process
in series? (the three-step transformation may be shown horizontally
or vertically)
Group content
in appropriate areas. For example, if you have three main points,
you'll need three main areas plus the areas for the title,
summary and the acknowledgments.
Back
to top
|
| |
5.
Creating Coherence -
Constructing a coherent poster means that it’s easy for your audience
to move from one topic discussed on your poster to another and to see
the relationships between them. Create coherence by carefully planning
the arrangement of information by relying on what we know about how readers
read.
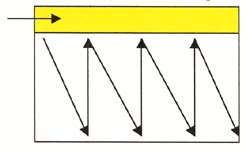
Since English-speaking readers read text from left to right and top to
bottom, use this pattern to inform the arrangement of information in
your poster. While the poster title is conventionally centered across
the top of the poster, it can be placed to the left or to the right,
but the area it occupies should command the rest of the space, perhaps
by using a colored area behind it, as shown below.
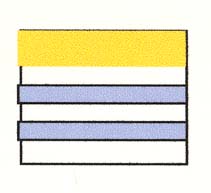
Pattern eyes follow in reading a four-column poster:
Other useful
strategies for guiding the reader's attention and showing the
relative importance of each part of your poster’s content
include attending to blank space, graphic hierarchies, indenting,
visuals, and color.
- Blank
space defines relationships among objects. Marginal
space around the sides and bottom creates an inclusive
frame for the content of your poster. Don't run text completely
to the edge of the poster. Leave some framing blank space.
Separate columns with blank space, too (although these
areas may be colored) so that the viewers' eyes can quickly
pick out the pattern or arrangement of content.
Use blank space to help dictate the scale of the information you present
and the visuals and text that communicate it. Are there three major
areas? Four? Five? The design should help the viewer know right away
where to begin.
Blank space tends to push a viewer's eye toward sections it surrounds,
but it seems to push apart text or images if there is too much space.
The meaning of "too much" depends on the overall size of
the area.
- Graphic
Hierarchies help viewers determine quickly which sections
are of equal importance and which are of lesser or subordinate
importance. Graphic hierarchies can consist of point sizes,
color areas, line widths, and so on.
The rule of thumb is: BIG = IMPORTANT small = subordinate
- Indenting information
helps to create white space around the information that emphasizes
it and makes the information easy to scan with the eyes.
You can indent information by generating bulleted or numbered
lists or by creating more white space around paragraphs or
other chunks of related visual or textual information.
- Visual
Aids. Arguably the most critical design elements of
any poster display include the use of visuals, font style/size,
and color. The effective use of these features helps to
make your poster both aesthetically pleasing and easy for
the viewers’ eyes to scan.
Posters are characterized by their use of both text and visuals. In posters,
visual aids such as tables, graphs, photographs (and a variety of other
discipline-specific visuals) can communicate a wealth of information. To
use these visuals to communicate information accurately and effectively,
it’s best to remember these tips:
VISUALS
TIPS
- Enlarge
visuals so that they’re easily viewed. Remember that
your audience typically views your poster from three to five
feet away. Use these distances when judging how legible all
aspects of your visuals will appear.
- Make sure
that any labels you use with the visuals are large enough
as well. Font sizes for these labels should be between 30-36
points.
- Number
and title each visual that you use and be sure to reference
them in the text.
- Think
of photos, drawings, and so on should be independent elements
that can be understood without reading a long explanation.
The heading and labels on your visual will help it stand
alone. Remember that your audience may only scan your poster,
and the visuals may be the only features they examine.
- Eliminate
any nonessential information (grid lines used in the background,
extraneous information used in keys) and try to redesign
your visuals to emphasis the most critical information you
wish to communicate.
- Remember
that photographs or other illustrations may be distorted
and difficult to read if enlarged. Double-check the clarity
of these visuals by printing them out before you print out
your entire poster.
Font
Style/Size. Improve legibility with the correct font
size. To make the information you display legible for your
audience, you must judge how close a reader must be to read
the smallest crucial piece of data.
Here is a guide to font style and size if your viewers are likely to
be three to five feet from your poster:
Serif fonts have "tails" (serif means tail in French) at the
base and tips of letters and have line widths that thin out on curves.
They are harder to read from a distance, especially if the contrast between
the letter and the background is poor. Sans Serif fonts have consistent
or uniform line widths or line widths that vary only a little. They have "no
tails" (sans serif means "without a tail" in French).
| Title
(6 – 8 words) |
 (Arial
bold) (Arial
bold)
| 90
- 120 pt or more |
| Headings
(3 words) |
 (Arial) (Arial) |
36
- 48 pt |
| Text |
Serif (Times
) |
30
- 36 pt. |
VERY
IMPORTANT: Headings of the same level of importance should be
in the same size and type of font.
All labels should be legible from at least 3 feet away.
Color. Color can “make or break” a poster’s
legibility and aesthetic appeal. Incorporating color appropriately
in a poster display means choosing and using color purposefully.
Use color to show:
- which
elements go together (are similar in value or are related
in topic)
- which
elements differ
For example,
if you use a background color for two different areas of the poster,
those areas should be related in some way. Back in the days when
people displayed posters by using by gluing printed pages to construction
paper, people sometimes used whatever colors came in the paper
assortment. While variety is pleasing, poster viewers want MEANINGFUL
variety.
In deciding how to use color in your poster display, here are some good
rules of thumb:
- DO use
color to show relationships among different areas of the
poster. Do use color to create coherence and guide your audience
through the sections of the poster. Do use color sparingly
and purposefully—less is more
- DON’T
use color arbitrarily; think about the ways color can be
used to show relationships and incorporate this strategy
into your poster. There must be sufficient contrast between
the background and the text or between the background and
the diagrams for viewers' eyes to read easily. Use light
colors for your text (such as yellow) ONLY if the background
is dark; use fonts with a consistent shaft width so that
the letters won't seem to "thin out" or disappear
when viewed from a distance. There must be sufficient contrast
between the lettering and the background.
Back
to top
|
| |
6.
Option: Using a Template
The Cain Project web site has poster templates (PowerPoint files) in
vertical and horizontal layouts at its website at that you can download
to your computer. Click on "Download Poster
Design Templates" from the Resources section of the Cain Project
web Site. These posters have Rice logos on them that you can keep or
replace. These can be used to jump-start your design process.
Back to top
|
| |
7.
Applying Poster Style to the Text of Your Poster
Put your text on a diet. Shrink fat text to lean text, as in this example:
| Original |
Revised |
| The
ideal anesthetic should quickly make the patient unconscious
but allow a quick return to consciousness, have few side
effects, and be safe to handle. |
Ideal
anesthetics
- Quick
sedation
- Quick
recovery
- Few
side effects
- Safe
to handle
|
Details
Matter!
Check for consistent formatting, correct grammar, and correct spelling.
Avoid abbreviations and acronyms a viewer may not know. Give a correct
bibliography. Give credit to others (to establish your character and
ethics), and include contact information.
Back
to top
|
|